
Blog
How to Electroplate with PlateLab: A Step-by-Step Guide
Use PlateLab to plan copper, nickel, or zinc electroplating—from surface preparation and bath inputs to current, time, rinsing, and finish.
Electroplating results depend on more than choosing a metal and switching on a power supply. Surface preparation, cathode area, bath efficiency, plating thickness, current density, time, and post-treatment all affect the finished part. PlateLab Guided Plating brings those decisions into one step-by-step electroplating guide for copper, nickel, and zinc.
Quick answer
To electroplate with PlateLab, choose the base material and plating metal, enter the total immersed surface area and bath details, prepare and activate the surface, then select a target thickness. PlateLab calculates Gentle, Balanced, and Faster current-and-time setups, checks the anode and cathode connections, and guides the run through plating, rinsing, drying, and post-treatment. Use its result as a controlled starting point alongside the bath manufacturer's technical data and your chemical-safety requirements.
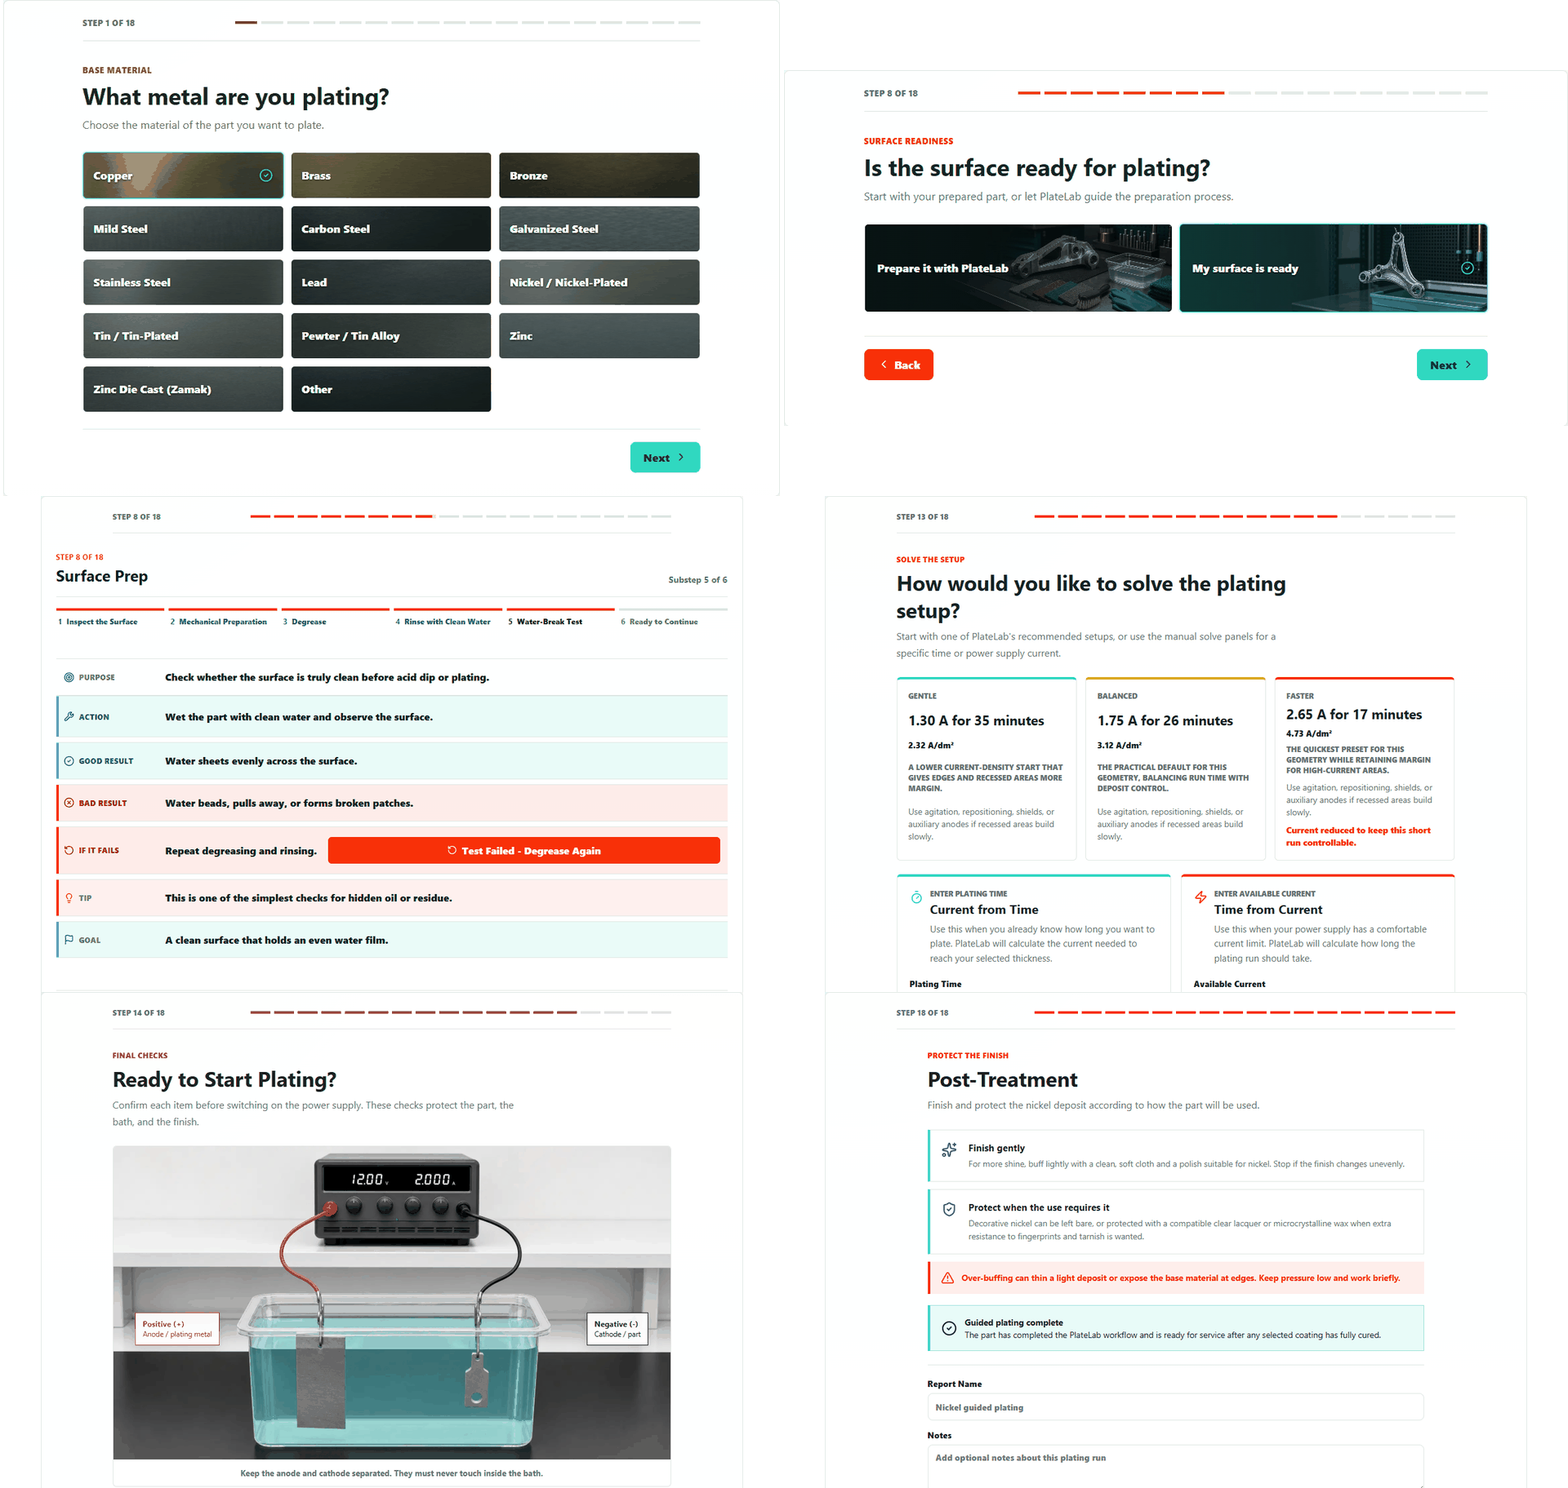
This guide explains how to use Guided Plating from the first material choice through the final rinse, drying, and protective finish.
What PlateLab Guided Plating does
Guided Plating turns the full electroplating process into an 18-step workflow. It helps you:
- Identify the base material and its condition
- Choose copper, nickel, or zinc as the plating metal
- Enter the cathode surface area and part geometry
- Prepare and activate the surface
- Enter bath volume and efficiency
- Choose a decorative, functional, or heavy-duty thickness
- Compare Gentle, Balanced, and Faster current-and-time setups
- Check anode and cathode connections before starting
- Run built-in degreasing, rinsing, acid-dip, and plating timers
- Finish with final rinsing, drying, and metal-specific post-treatment
PlateLab uses Faraday's law for the deposition calculation, then applies the selected geometry, bath type, bath volume, efficiency, thickness, and practical current limits to produce usable setup choices.
What you need before starting: measurements and safety
You will need the total surface area that will be immersed, including the front, back, sides, edges, holes, and recesses. Metric users enter square millimetres (mm²); Imperial users enter square inches (in²). You will also need the usable plating-bath volume and a realistic bath-efficiency percentage.
Electroplating involves electricity, acids, dissolved metals, and solutions that may irritate or burn skin, eyes, or the respiratory system. Read the Safety Data Sheet for every product, use compatible gloves and eye protection, work with effective ventilation, label containers, and keep food and drinks away from the work area. PlateLab is a calculation and workflow aid; it does not replace chemical training, a bath manufacturer's data sheet, or local safety requirements. The NIOSH Health and Safety Guide for Electroplating Shops and NIOSH Pocket Guide to Chemical Hazards provide additional hazard-control information.
1. Choose the base material and surface condition
Open PlateLab, select Guided Plating, and choose the material of the part you want to plate.
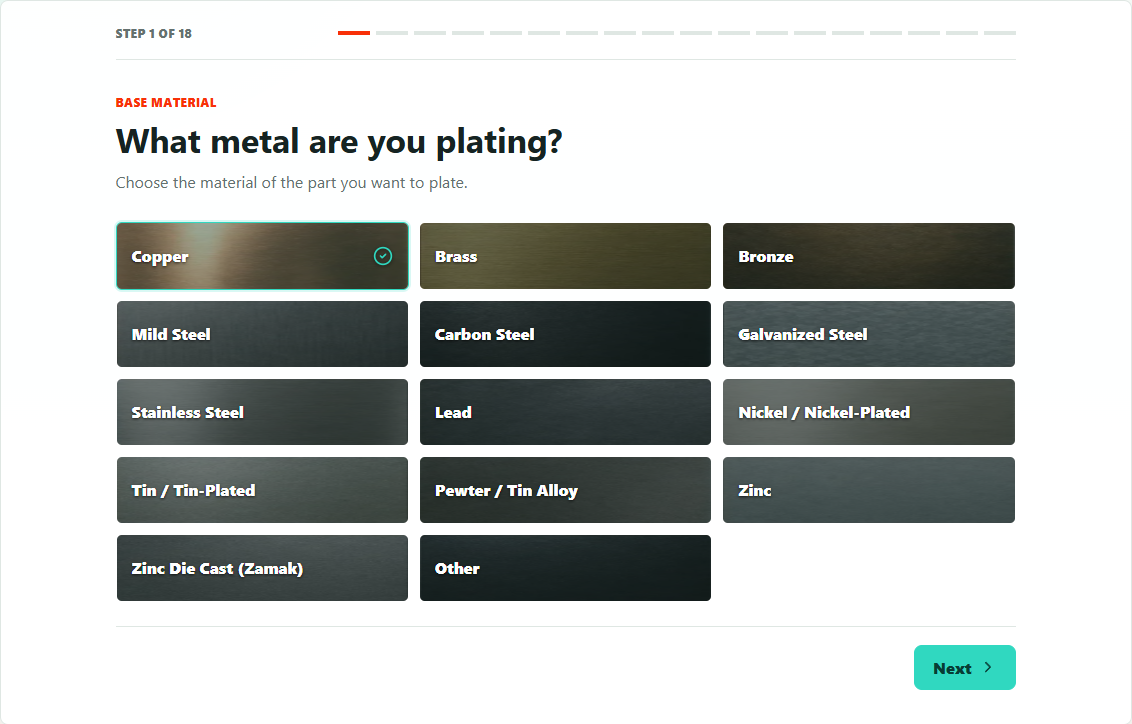
The list includes copper, brass, bronze, steels, stainless steel, galvanized steel, lead, nickel-plated parts, tin alloys, zinc, Zamak, and an Other option. PlateLab then asks for the surface condition. The available conditions change with the selected material because tarnish, oxide, white corrosion, and rust require different preparation and activation guidance.
Choose the closest accurate condition. Do not select Clean simply because loose dirt has been removed; a surface can still carry oxide, fingerprints, polish, lacquer, or oil.
2. Choose the metal you want to deposit
Select Copper, Nickel, or Zinc. This choice controls the density, efficiency guidance, thickness options, bath notes, current-density ranges, and post-treatment shown later.
The base material is what the part is made from. The plating metal is the new layer you want to deposit. For example, a brass part can be the base material while nickel is the plating metal.
3. Enter units, surface area, geometry, and bath type
Choose Metric or Imperial, then enter the total cathode surface area. PlateLab asks which geometry best matches the part:
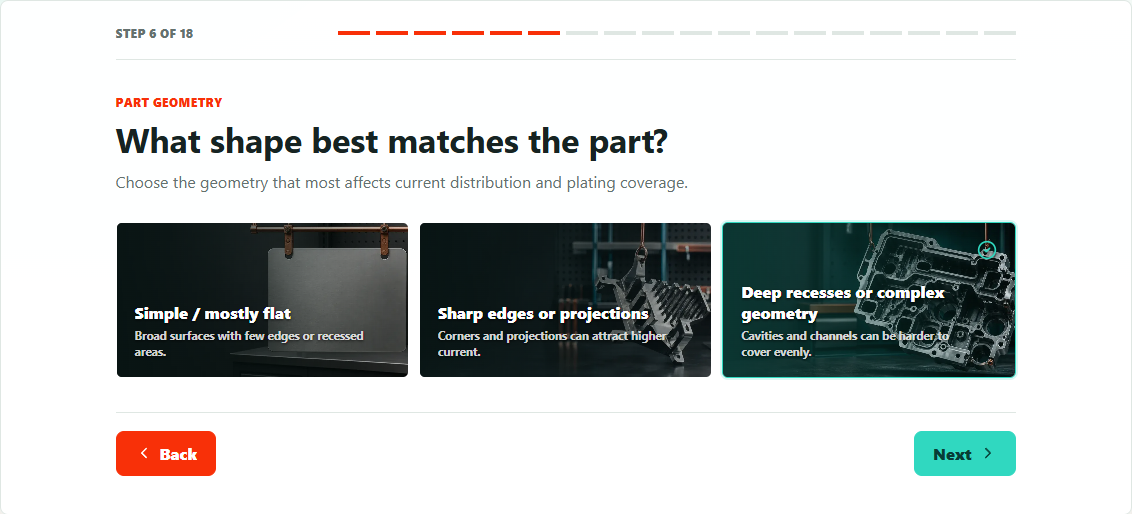
- Simple / mostly flat: broad, accessible surfaces with few recesses
- Sharp edges or projections: corners and tips where current can concentrate
- Deep recesses or complex geometry: cavities and shielded areas that can receive less current
Geometry matters because current distribution is rarely perfectly uniform. A current that plates a flat coupon well may burn exposed edges or leave deep recesses thin on a complex part.
Next, choose Commercial or Homebrew for the bath. Commercial baths should follow the supplier's technical data sheet. Homebrew baths receive more conservative guidance because composition and performance can vary more widely.
4. Decide whether the surface needs preparation
PlateLab asks whether the part is already prepared or whether you want the app to guide the surface-preparation process.

Choose Prepare it with PlateLab for a guided inspection, mechanical preparation, degreasing, rinsing, and water-break test. If the part has already been prepared using a controlled process, choose My surface is ready.
Use the water-break test
During guided preparation, PlateLab provides personalized degreasing and rinsing timers. The water-break test checks whether water forms a continuous film over the surface.
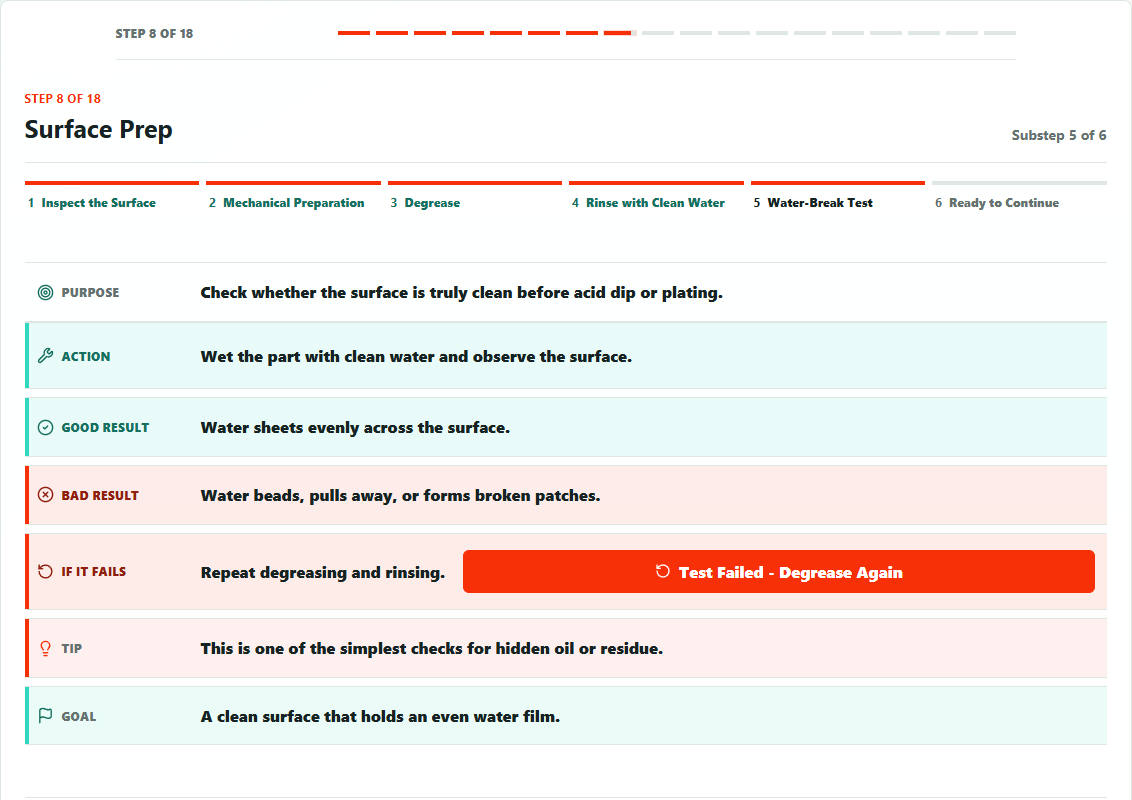
- Good result: water sheets evenly across the entire part
- Bad result: water beads, pulls away, or leaves broken patches
If the test fails, use Test Failed - Degrease Again. PlateLab returns to the degreasing step so contamination is corrected before activation. After cleaning, handle the part only with clean compatible gloves, hooks, tweezers, or wire.
5. Activate the surface with the Acid Dip guide
Surface activation removes the final light oxide and prepares the cleaned surface immediately before plating. You can ask PlateLab to guide the acid dip, use your own controlled process, or continue without acid dipping.
When you choose PlateLab guidance, the app shows acid choices appropriate to the base material and condition.
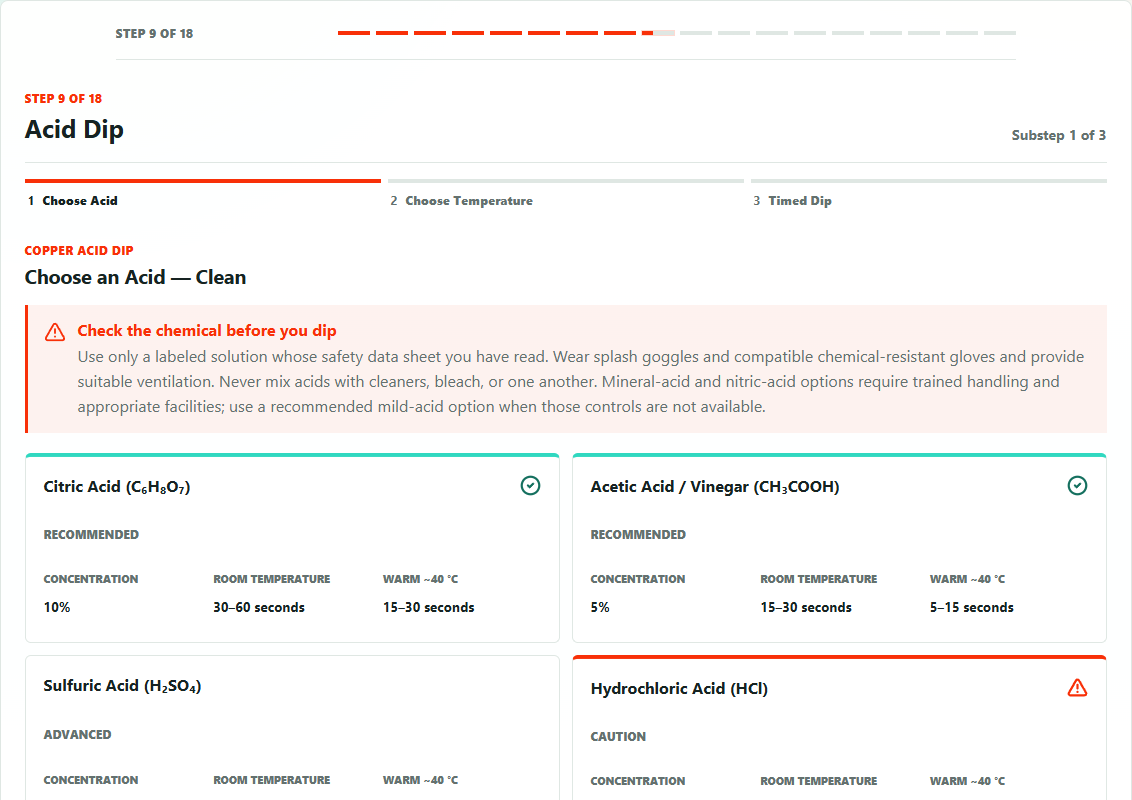
Recommended cards are highlighted, while caution or avoid choices are clearly marked. Select an acid, choose room or warm temperature when available, and use the timed dip. Remove and rinse the part when the suggested time is reached. Longer is not automatically better: excessive activation can attack the base material or create adhesion problems.
Never mix acids or improvise concentrations. Use only correctly labelled, compatible containers and follow the product's Safety Data Sheet.
6. Enter bath volume and bath efficiency
Enter the usable bath volume in millilitres or fluid ounces. PlateLab uses bath volume as one of the practical limits on recommended current.
Then enter bath efficiency as a percentage.
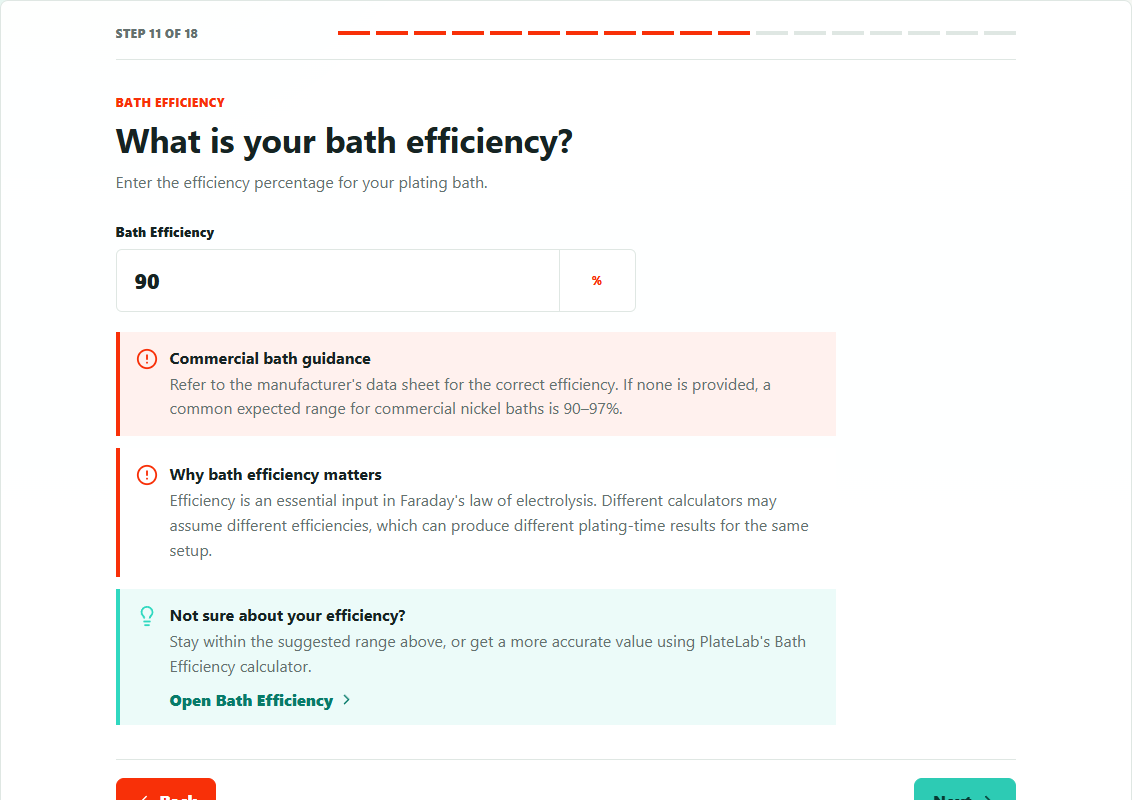
Efficiency is essential in Faraday calculations because not all electrical charge becomes deposited metal. PlateLab shows the commonly expected range for the selected metal and bath type, warns when the value is unusually high or low, and links to the Bath Efficiency calculator when you need to measure actual performance.
For a commercial bath, prefer the manufacturer's data sheet. For a homebrew bath, stay within PlateLab's suggested range unless you have measured the bath using a controlled thickness or mass test.
7. Choose the target plating thickness
PlateLab presents thickness options in micrometres (µm) or thousandths of an inch (mil), grouped by intended use.
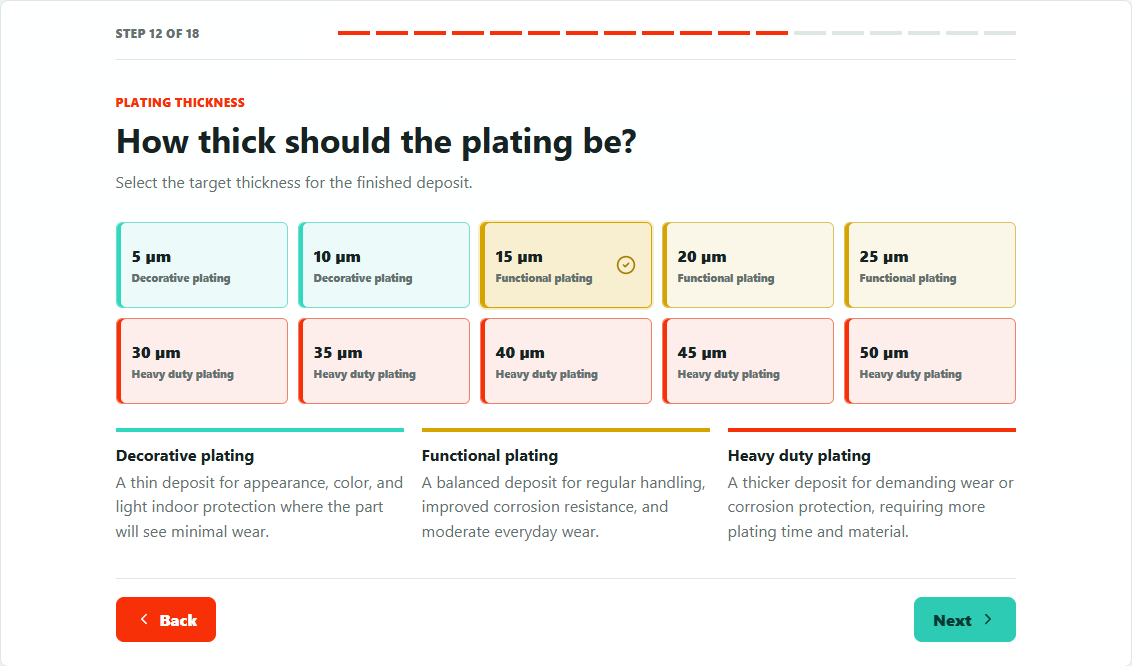
- Decorative: appearance and light surface protection
- Functional: a more durable working layer for repeated handling or moderate wear
- Heavy duty: a thicker deposit for demanding wear or corrosion-protection requirements
A thicker layer requires more deposited metal and therefore more charge. At the same current, plating time increases with thickness. Choose the lowest thickness that genuinely suits the part rather than treating maximum thickness as the default.
8. Compare Gentle, Balanced, and Faster setups
PlateLab calculates three suggested current-and-time combinations using the same target thickness.
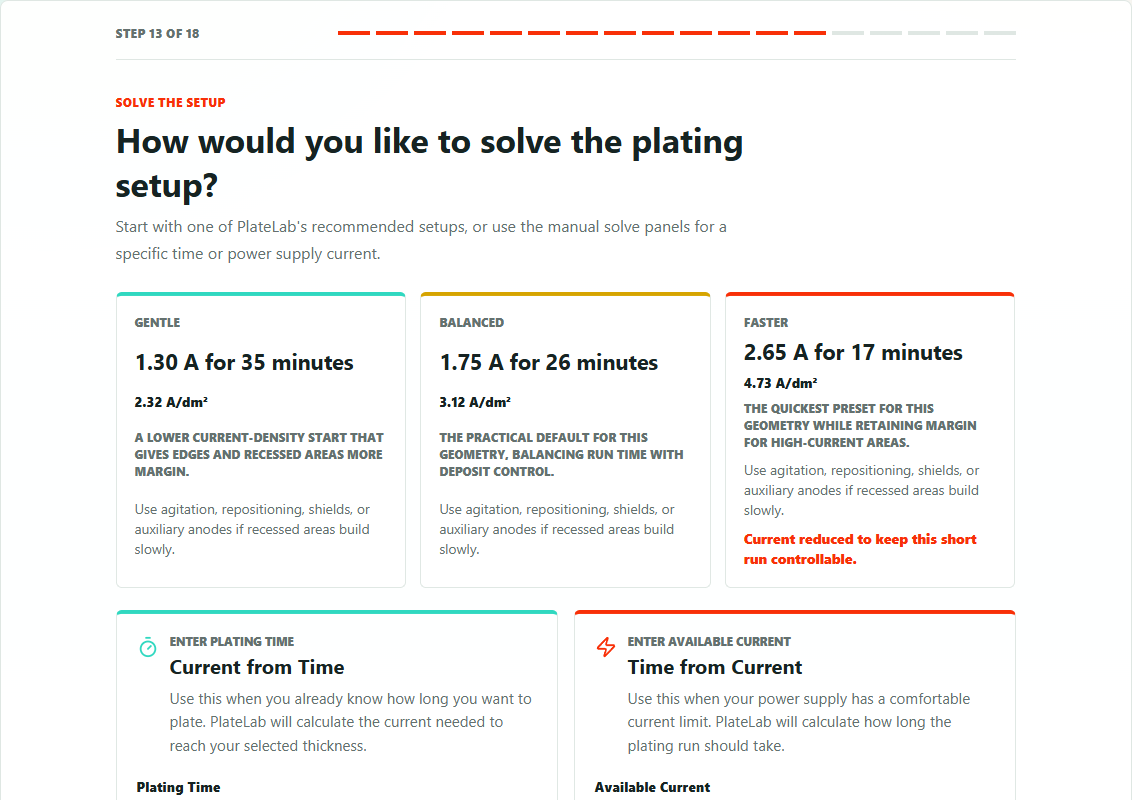
- Gentle: lower current density for cautious first runs, edges, recesses, or variable homebrew baths
- Balanced: a practical starting point for a prepared part and stable bath
- Faster: higher current density within the selected bath guardrails, with closer monitoring of edges and deposit quality
Currents are rounded to 0.05 A increments to match common bench power supplies. PlateLab recalculates time after rounding so the target charge remains consistent.
You can also enter a known plating time to calculate required current, or enter the current your power supply can provide to calculate the required time. Select one result card to activate Next.
9. Complete the preflight check
Before power is applied, PlateLab displays the correct electrical arrangement and a metal-specific checklist.
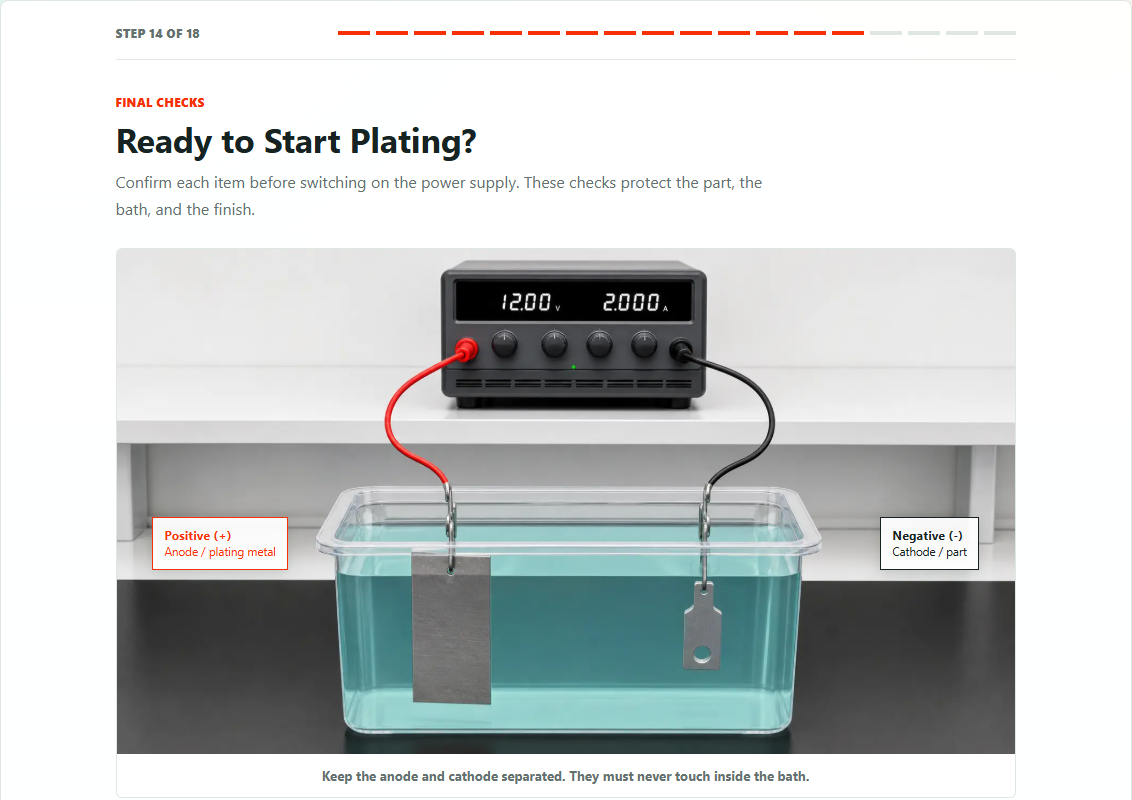
Confirm that:
- The plating-metal anode is connected to positive (+)
- The workpiece cathode is connected to negative (-)
- Connections are secure and outside the solution where appropriate
- The bath is clear and free from debris
- Temperature, pH, agitation, and anode condition match the bath instructions
- The part is positioned for solution movement and even current distribution
Reversing the connections prevents the intended deposit and can dissolve or damage the workpiece.
10. Run the plating stopwatch
The plating screen keeps the selected current visible beside the countdown.
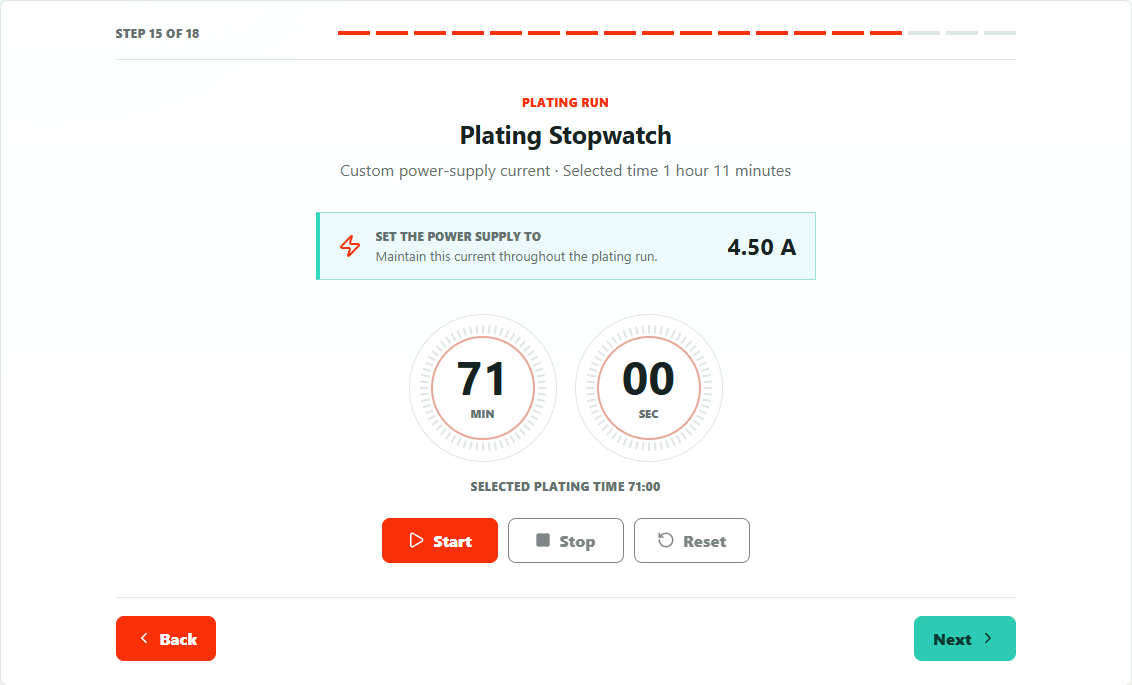
Set the power supply to the displayed current, start the timer, and watch the first minutes of the run. Stop and inspect if edges become dark, powdery, rough, or burnt, if gas evolution becomes excessive, or if the current will not stabilize.
The timer can be started, stopped, and reset, and PlateLab sounds an alarm when it finishes. Keep the device available and do not rely on the alarm as the only process control; browser and operating-system audio restrictions can vary.
11. Final rinse, dry, and protect the deposit
After plating, PlateLab guides the final rinse, controlled drying, and plating-metal-specific post-treatment.
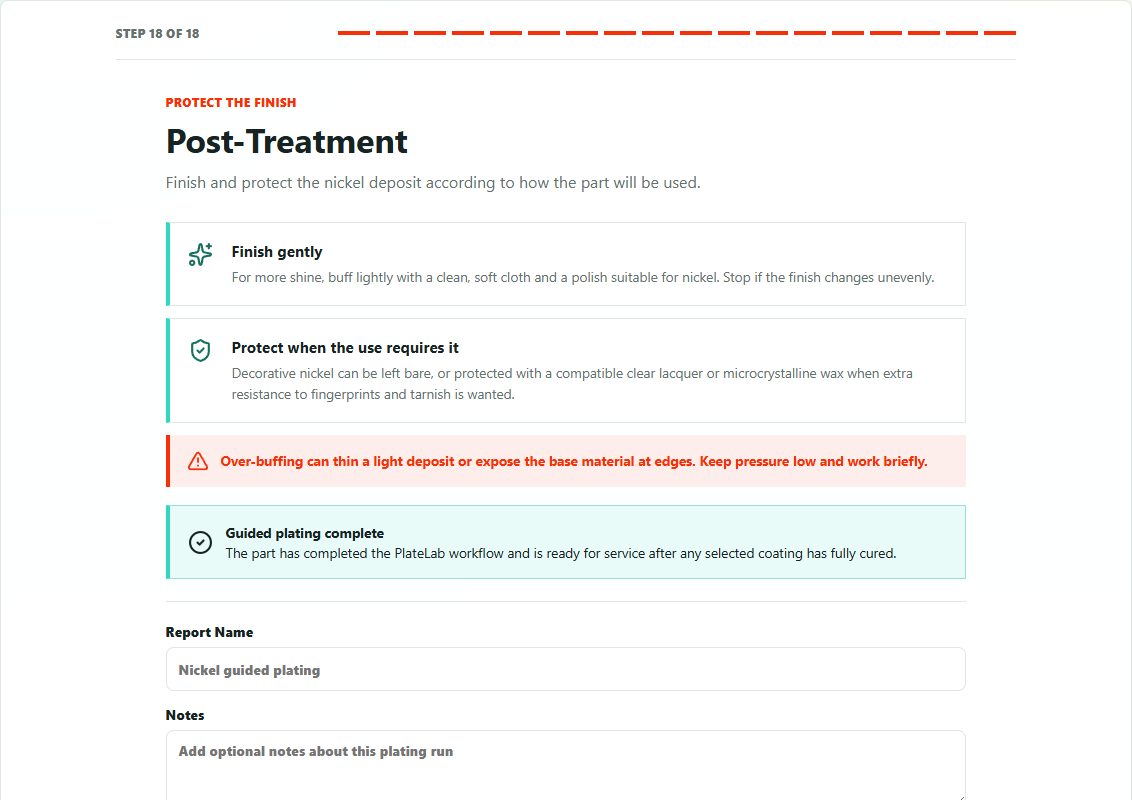
Rinse promptly to remove bath residue without touching the fresh deposit. Dry without rubbing a soft or thin coating. The final guidance changes by plating metal:
- Copper may need prompt wax, lacquer, or another compatible coating to slow tarnishing
- Nickel can be lightly buffed only when the deposit is thick and well-adhered enough
- Zinc commonly needs a compatible conversion coating, clear coat, or wax for stronger corrosion protection
At the final step, you can download the Guided Plating report as a PDF. Signed-in users can also save the run to their Attalos account.
Guided Plating setup checklist
Before starting the timer, verify:
- Total immersed surface area includes every plated face and recess
- Base material, condition, plating metal, and geometry are correct
- Bath volume and efficiency are realistic
- Thickness matches the intended use
- Power-supply current can hold the selected value
- Positive is connected to the anode and negative to the part
- PPE, ventilation, rinse water, and spill controls are ready
- The part passes the water-break test and is not touched afterward
Frequently asked questions
How does PlateLab calculate electroplating time?
PlateLab uses Faraday's law with the selected metal, surface area, target thickness, and bath efficiency. Guided Plating then applies geometry, bath type, bath volume, current-density guidance, and practical power-supply increments before showing the final current and time.
Which PlateLab setup should a beginner choose?
Balanced is a practical default when the surface is correctly prepared and the bath is stable. Gentle is more forgiving for a first test, complex geometry, uncertain bath condition, or a homebrew bath. Always test valuable work on scrap or a small coupon first.
Why does bath efficiency change plating time?
Efficiency represents the share of electrical charge that actually deposits the target metal. A lower efficiency requires more total charge and therefore more time at the same current.
Do I always need an acid dip before electroplating?
Not every material and process uses the same activation. Guided Plating offers PlateLab guidance, your own controlled process, or continuing without an acid dip. Follow the base-material requirements and the bath manufacturer's process sheet.
Can PlateLab guarantee the final finish?
No calculator can guarantee a finish because bath chemistry, contamination, temperature, pH, agitation, anodes, electrical contact, and surface preparation all matter. PlateLab provides a controlled starting point and helps you document the setup.
Does PlateLab replace the plating-bath manufacturer's instructions?
No. PlateLab helps calculate and organize the process, but the bath supplier's technical data sheet remains the authority for chemistry, temperature, pH, agitation, anodes, current-density limits, and required post-treatment. When the two differ, follow the validated process for your specific bath.
For broader product and process answers, see the PlateLab electroplating FAQ.
Start Guided Plating in PlateLab and take your next copper, nickel, or zinc electroplating run from surface inspection to a documented finish.