
Blog
How I Restored a Weathered Wooden Garden Table in Cyprus
See how I restored a wobbly wooden garden table by repairing split wood, reusing donor timber, cleaning hardware and applying teak oil.
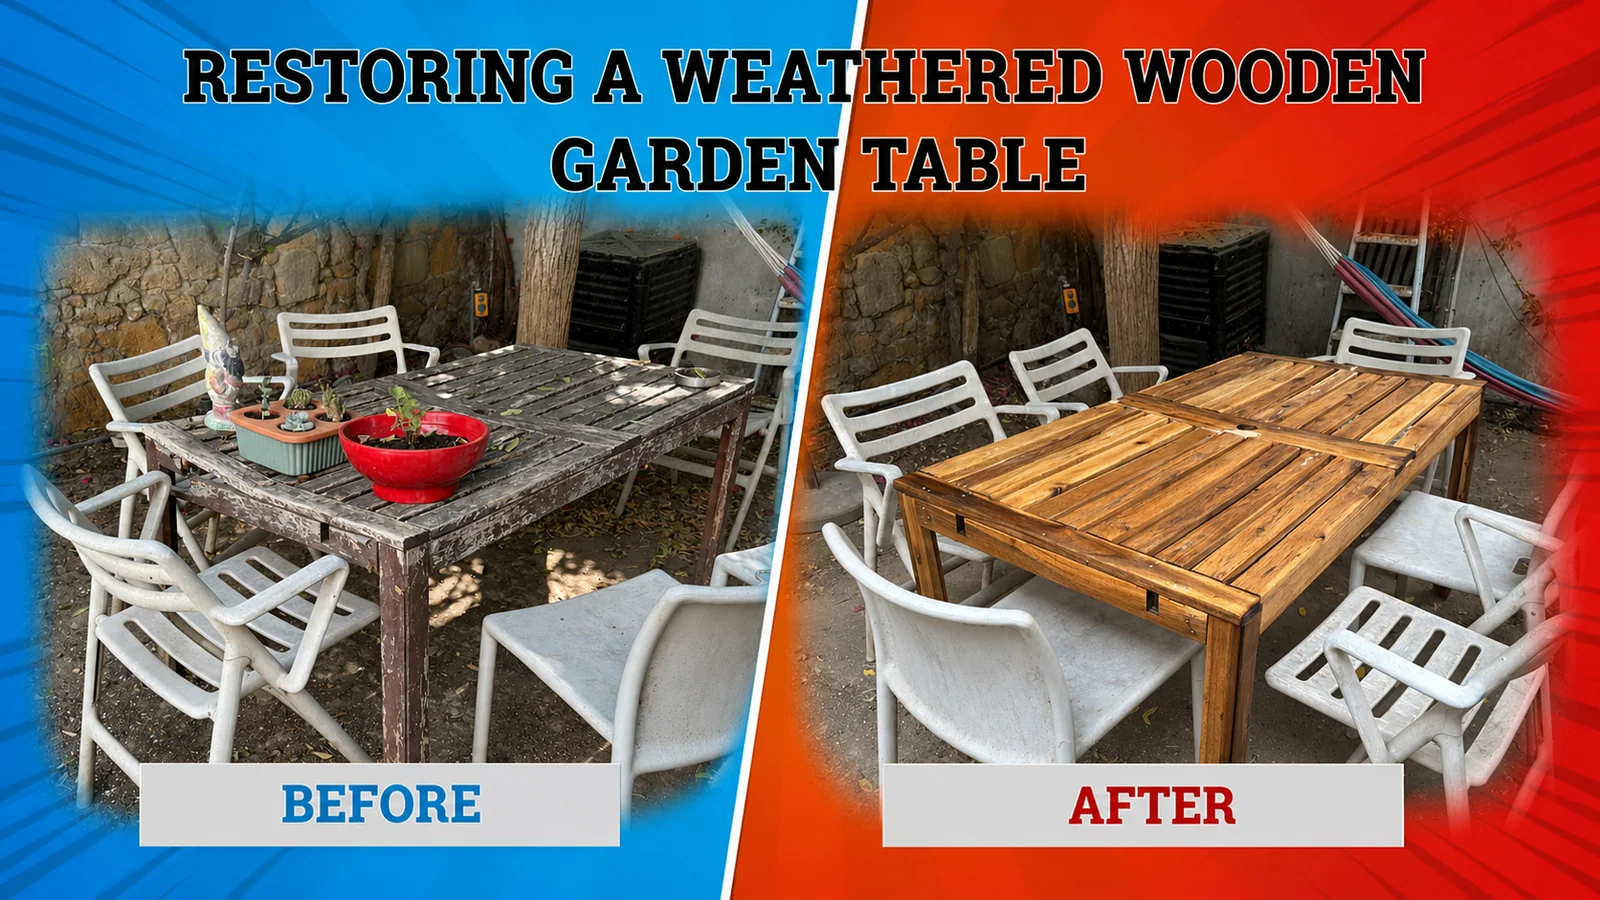 Before and after: the weathered, unstable table and the completed six-person table after structural repairs, donor-timber reinforcement and two coats of exterior teak oil.
To restore a weathered wooden garden table, begin with the structure: inspect the legs, rails, joints and fastener locations before sanding or refinishing. Disassemble only as far as necessary, repair or replace split timber, restore dependable screw locations, dry-fit the parts, clean or replace corroded hardware and apply an exterior finish according to its product instructions.
That is the short answer. This project required all of those steps.
The table was not merely grey and peeling. It wobbled, several joints had opened, frame members were split, and two stripped screws resisted disassembly. After repairing the wood, retiring the unused extension system and reusing its arms as reinforcement, the table became strong and stable enough for regular family use again.
The essential sequence
Inspect → document → disassemble → repair → sand → dry-fit → reinforce → finish → reassemble → verify stability
Garden-table restoration at a glance
| Project detail | What I found or did |
|---|---|
| Furniture | Extendable wooden garden table |
| Location | Cyprus |
| Initial condition | Wobbly, structurally weakened and heavily weathered |
| Main damage | Failed finish, grey wood, split rails, broken tabletop components, rusted fasteners and stripped screws |
| Surface preparation | Orbital sanding with 120 grit, followed by 220 grit for this finish and project |
| Structural repairs | Glued splits, donor-wood reinforcement and central braces |
| Hardware treatment | White-vinegar soak, cleaning, thorough drying and temporary water-displacing protection |
| Finish | Two coats of an exterior teak-oil product |
| Functional change | Extension mechanism retired; its sound timber reused in the repair |
| Final capacity | Six people |
| Final result | Strong, stable and no longer wobbling |
When is a weathered wooden table worth restoring?
A weathered table is usually a restoration candidate when enough sound timber remains to carry the expected loads and damaged joints can be repaired without hiding uncertainty. Grey colour, a failed finish, shallow checks and surface roughness can look severe without necessarily meaning the wood is structurally lost.
Repair becomes less sensible when critical members are soft or crumbly, decay extends deeply around joints, fasteners cannot be anchored in sound material, or the completed table cannot be made stable. Decorative filler and oil cannot compensate for structural decay.
Before starting, check:
- whether all four legs remain sound, especially near their ends;
- whether rails and aprons are split, soft or missing material;
- whether corner brackets still bear against solid wood;
- whether joints move under moderate hand pressure;
- whether screw holes can be restored or relocated safely;
- whether the tabletop supports normal loads without sudden movement; and
- whether replacement timber would be safer than retaining a damaged part.
This table passed that test. Its finish had failed badly, but much of the underlying timber was still usable.
Life, engineering and a table asking for help
At the beginning of 2026, a major life change brought me to Cyprus. The light, food, climate and outdoor way of living felt familiar to me as a Mediterranean man. The sun, however, was not particularly gentle.
From the balcony I could see a garden table that had endured years of moisture, winter weather and intense summer sunlight. My wife had bought it some time ago, and it had already lived a full outdoor life. Its dark finish was peeling, parts of the structure had separated, and the entire table moved when touched.
Normally I would have started immediately. Most of my workshop equipment and recording gear were still in another country, though, so I spent several months planning the repair and gradually collecting a temporary tool kit from local hardware shops.
I usually record restoration projects for YouTube. This time I documented the work mainly through photographs—and occasionally forgot to photograph a stage. The Cyprus heat also made an iPhone a reluctant workshop companion.
This was not a workshop-perfect restoration with every specialised tool within reach. It was a practical repair completed during a move with locally available materials, limited equipment and some carefully controlled improvisation. In engineering terms, that made the constraints part of the project.
What condition was the garden table in?
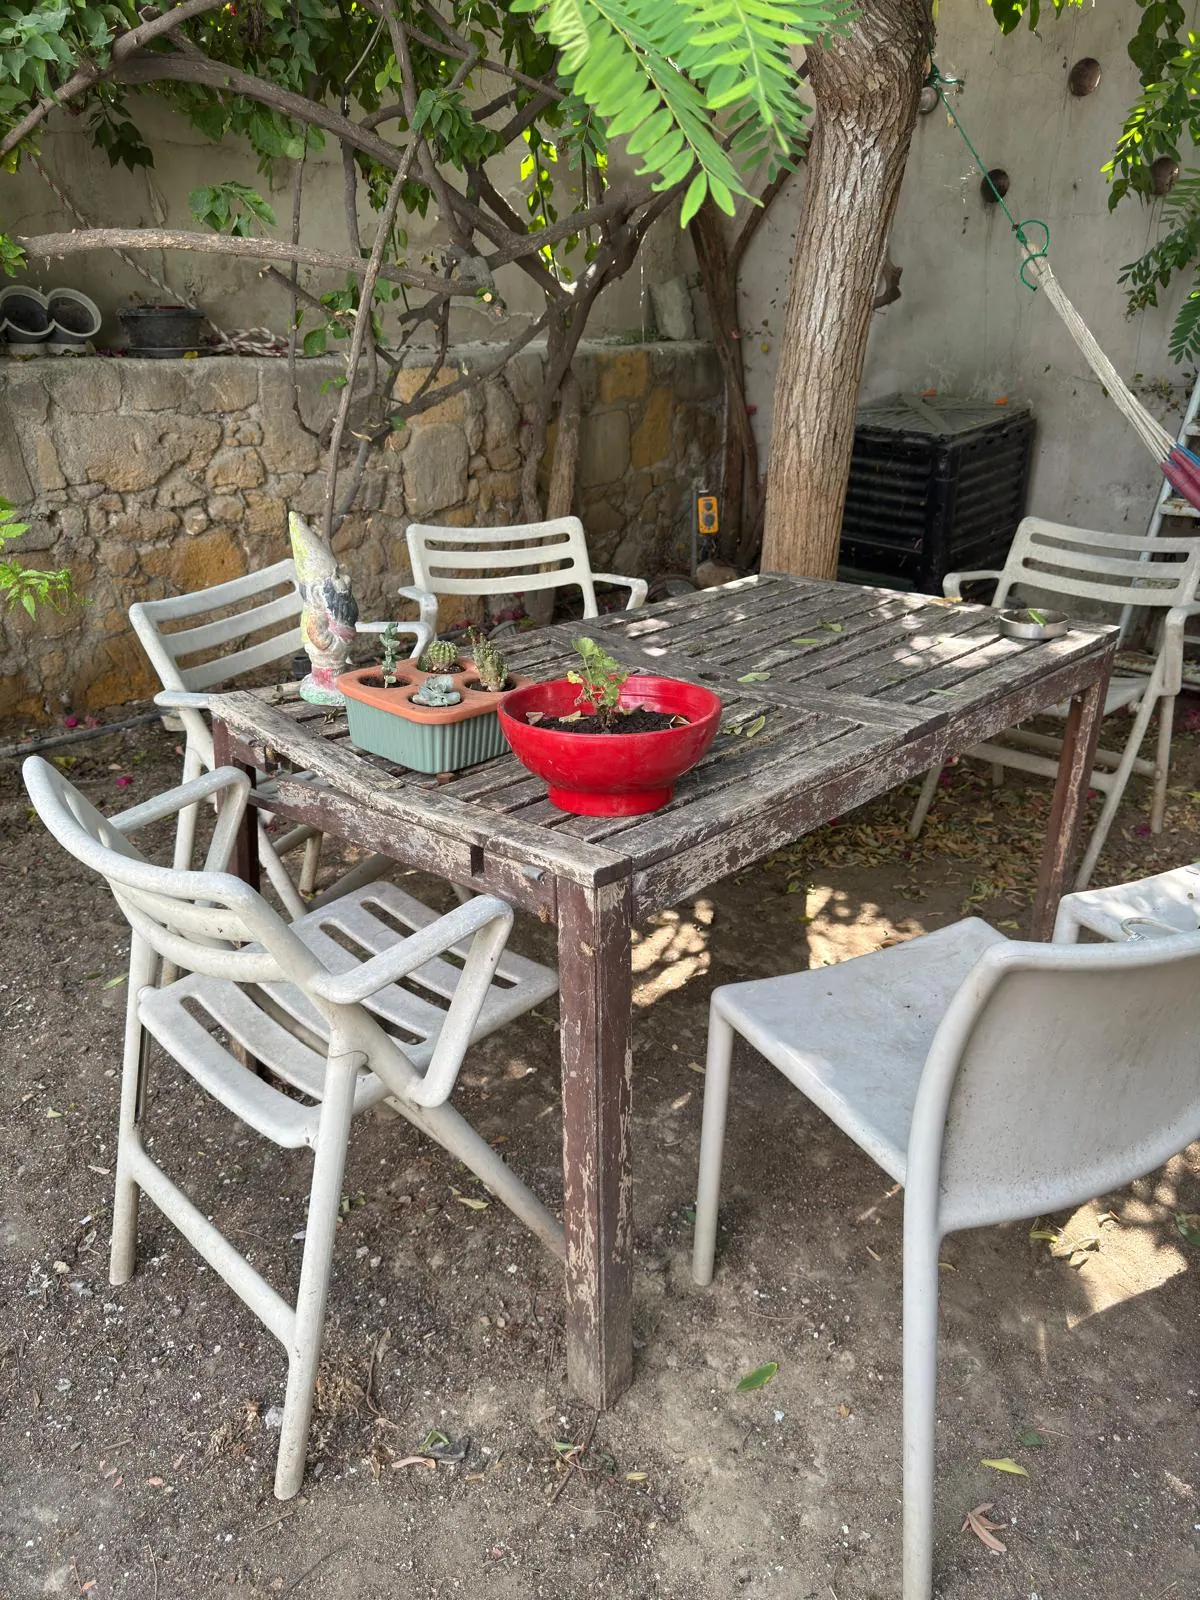 The table was still standing, but opened joints and damaged rails made it unstable in use.
From a distance, the table still looked functional. Up close, the damage was difficult to ignore.
The original dark finish had failed across most exposed surfaces. The uncovered wood had turned grey and rough, debris had collected between the slats, and the outer rails were cracked around several joints. More importantly, the frame wobbled when touched.
The USDA Forest Products Laboratory’s explanation of wood weathering describes moisture, sunlight, temperature changes, abrasion and biological exposure acting together at the wood surface. Sunlight initiates surface degradation; repeated wetting and drying can contribute to raised grain, checking, splitting and distortion.
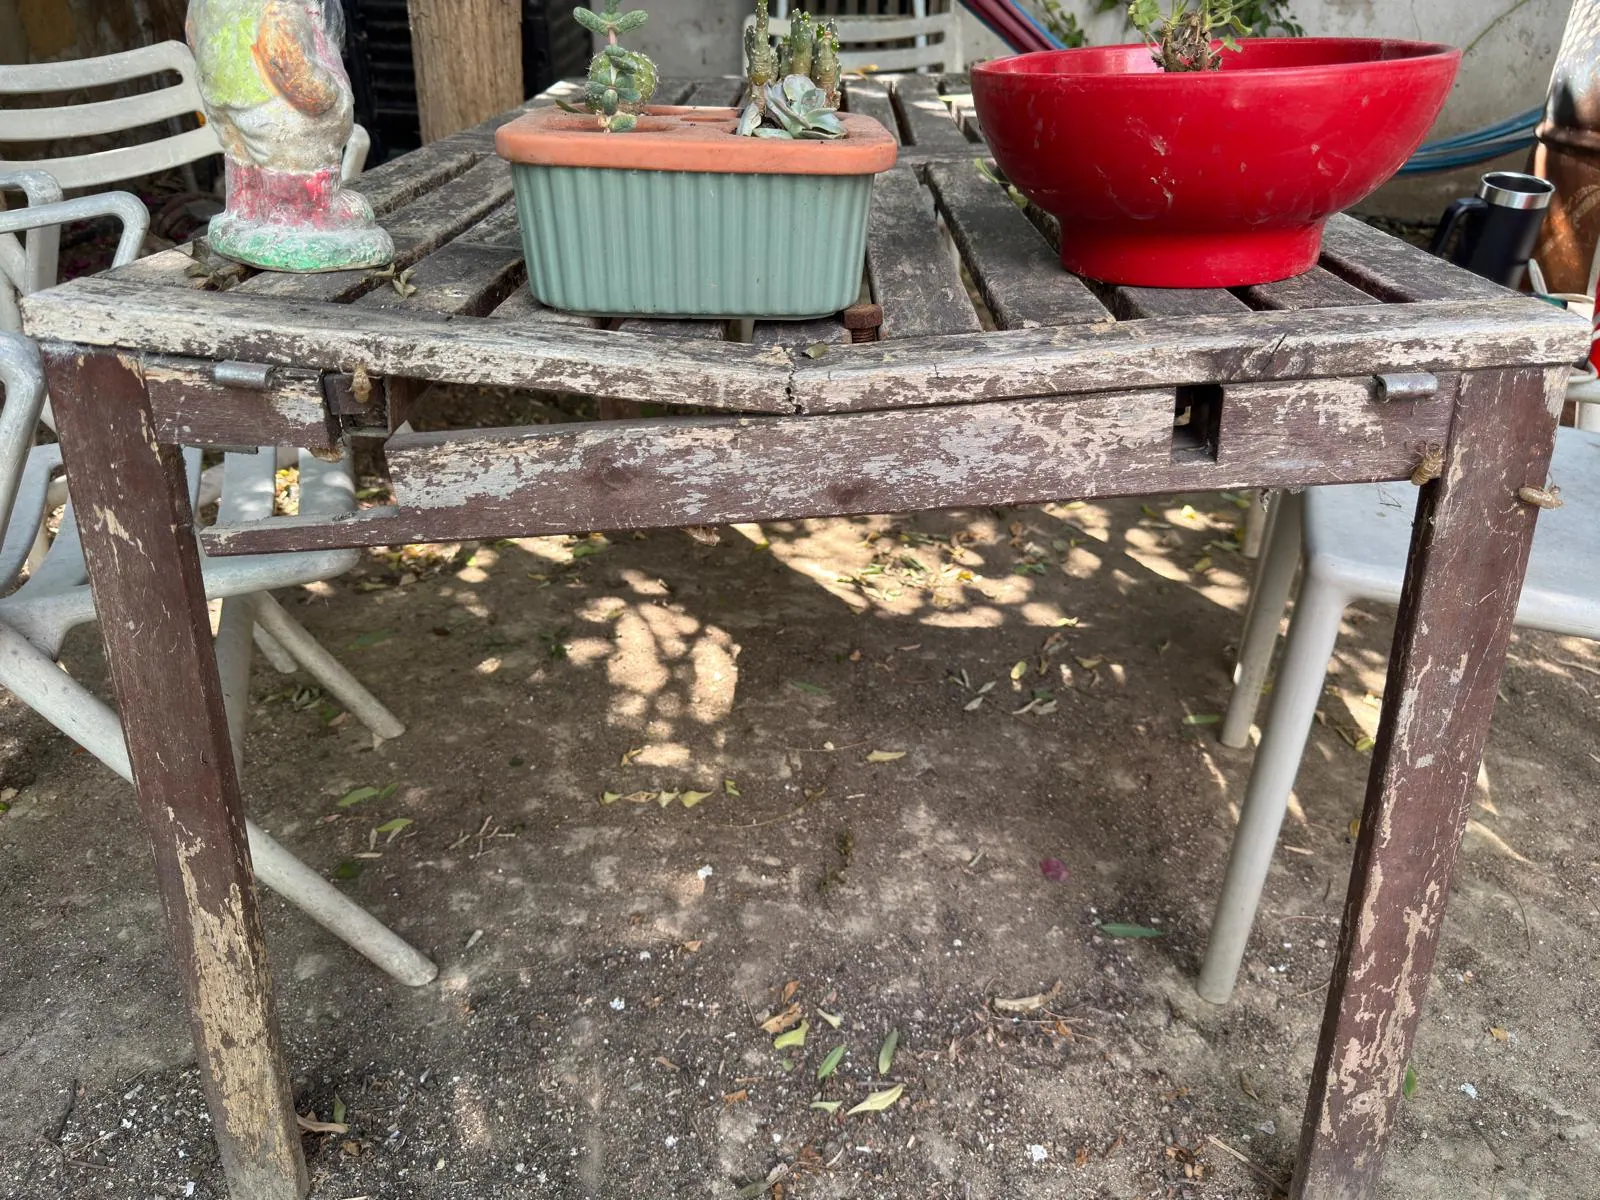 The short side confirmed that this was a structural repair, not only a refinishing job.
Applying a fresh finish at this stage would merely have improved the colour of an unreliable table. The opened joints and split rails had to be understood and repaired first.
What did I find underneath the table?
Turning the table over revealed years of sheltered garden life: dirt, webs and several empty insect shells attached to the timber.
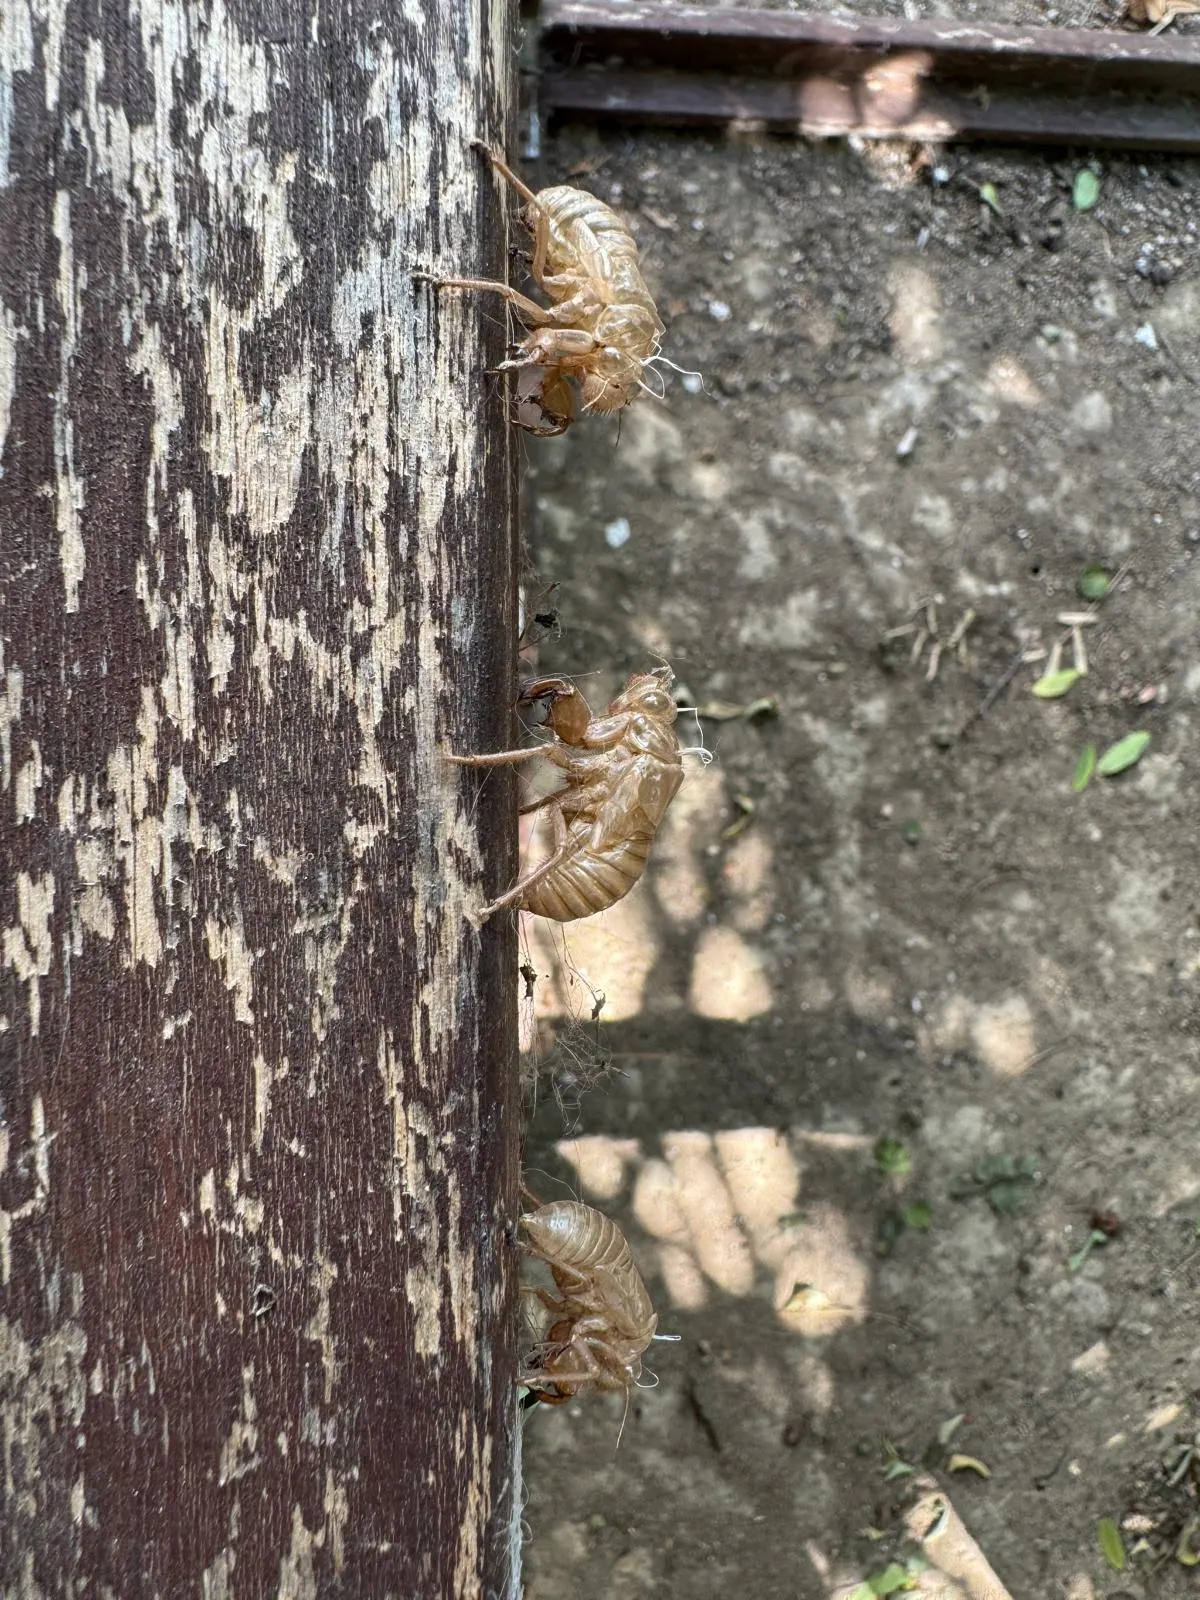 The empty shells were harmless evidence of cicadas using the table as a surface on which to complete their final moult.
Their form was consistent with cicada exuviae. University of Minnesota Extension explains that cicada nymphs climb objects to moult into adults and leave hollow cast skins behind. They were not evidence that cicadas had eaten the table.
I also found small mud structures in sheltered areas. They appeared consistent with abandoned cells made by solitary mud-building wasps, although an exact species cannot be confirmed from these photographs. Utah State University Extension notes that mason, potter and mud-dauber wasps build several forms of mud nest on protected structures.
The shells, webs and abandoned cells were removed so I could inspect the timber beneath them. The insects were interesting occupants; weather remained the main cause of the table’s deterioration.
Discovering the hidden extension system
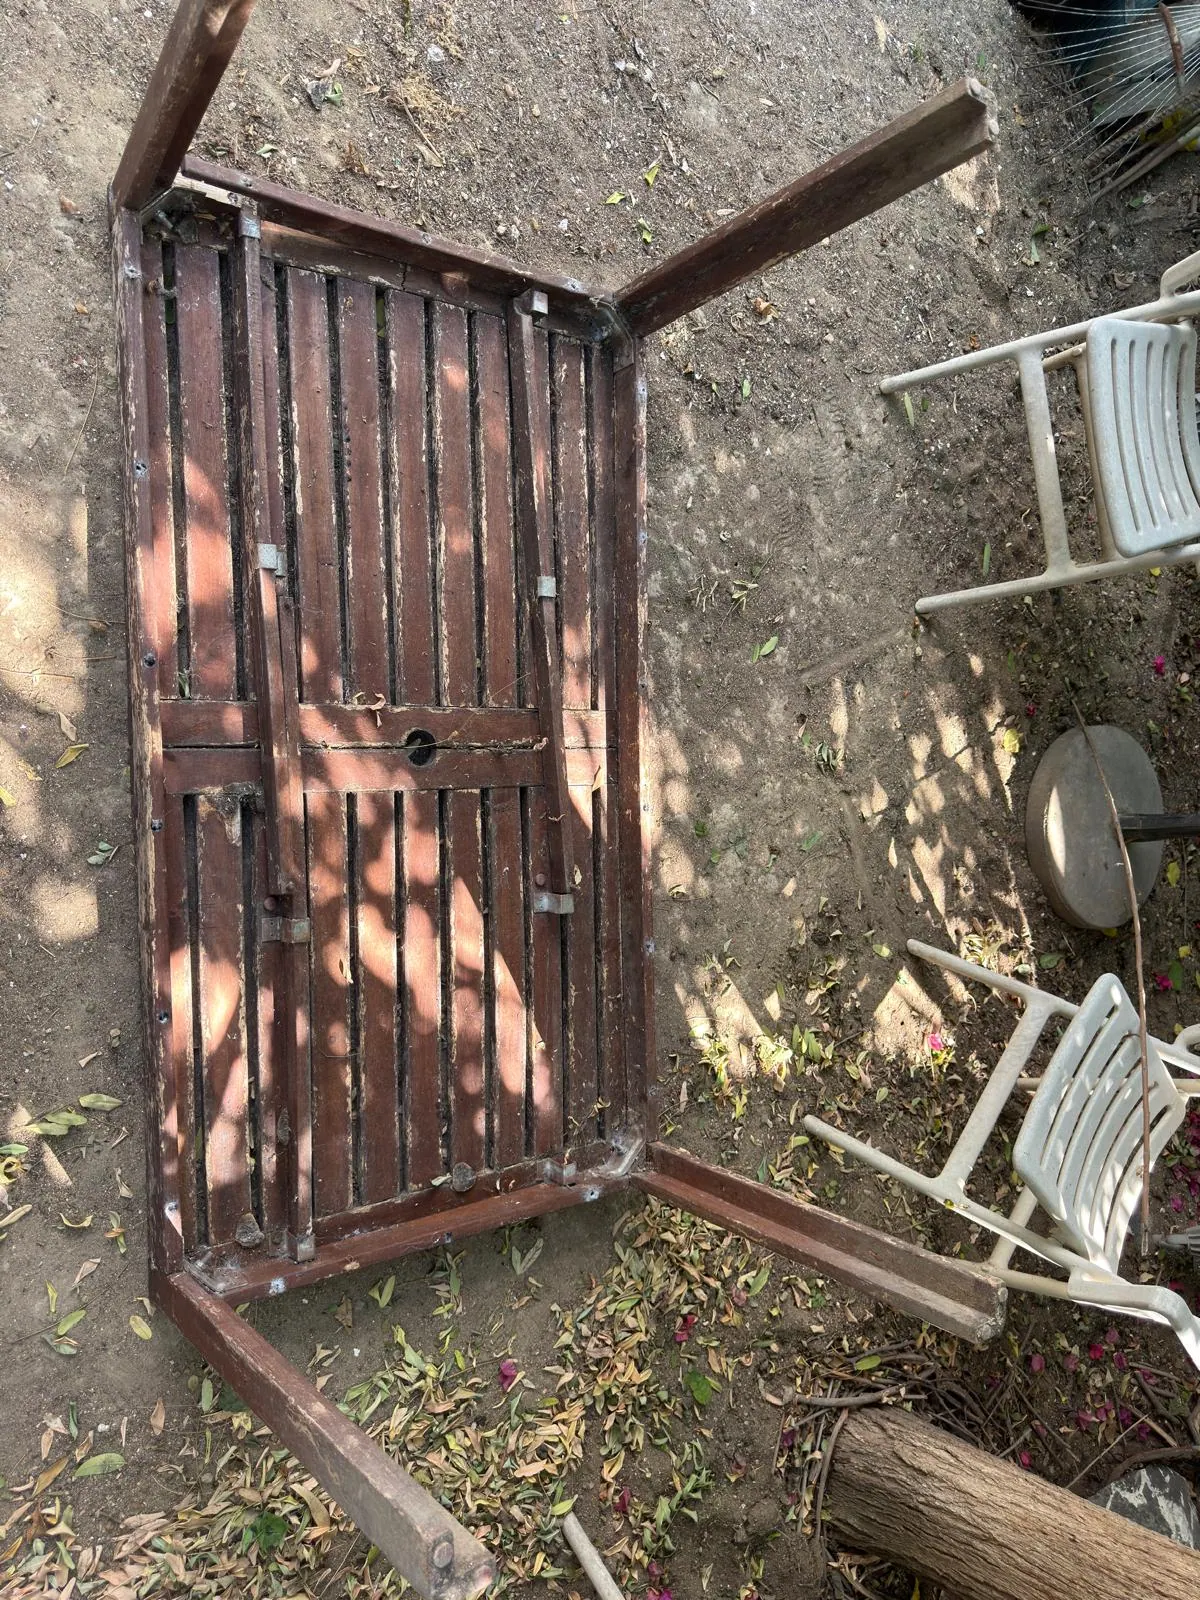 Turning the table over revealed the extension system and the less-weathered underside.
The mechanical surprise was the table’s old extension system. Two arms had originally projected from the short sides to support removable tabletop sections. One arm was missing from its normal position, but I had already found it elsewhere in the garden during spring cleaning.
My wife and I decided that we no longer needed the extension function. The standard table could already seat six people. That choice later supplied the restoration with original, aged donor timber whose dimensions and appearance matched the table better than random replacement wood.
The table had effectively brought its own spare parts.
The underside was also noticeably better preserved than the top. It had received less direct sunlight and rain, so more of the original finish remained. Where construction geometry allowed, I later reversed components to place their better-preserved faces upward.
Inspecting the corner connections
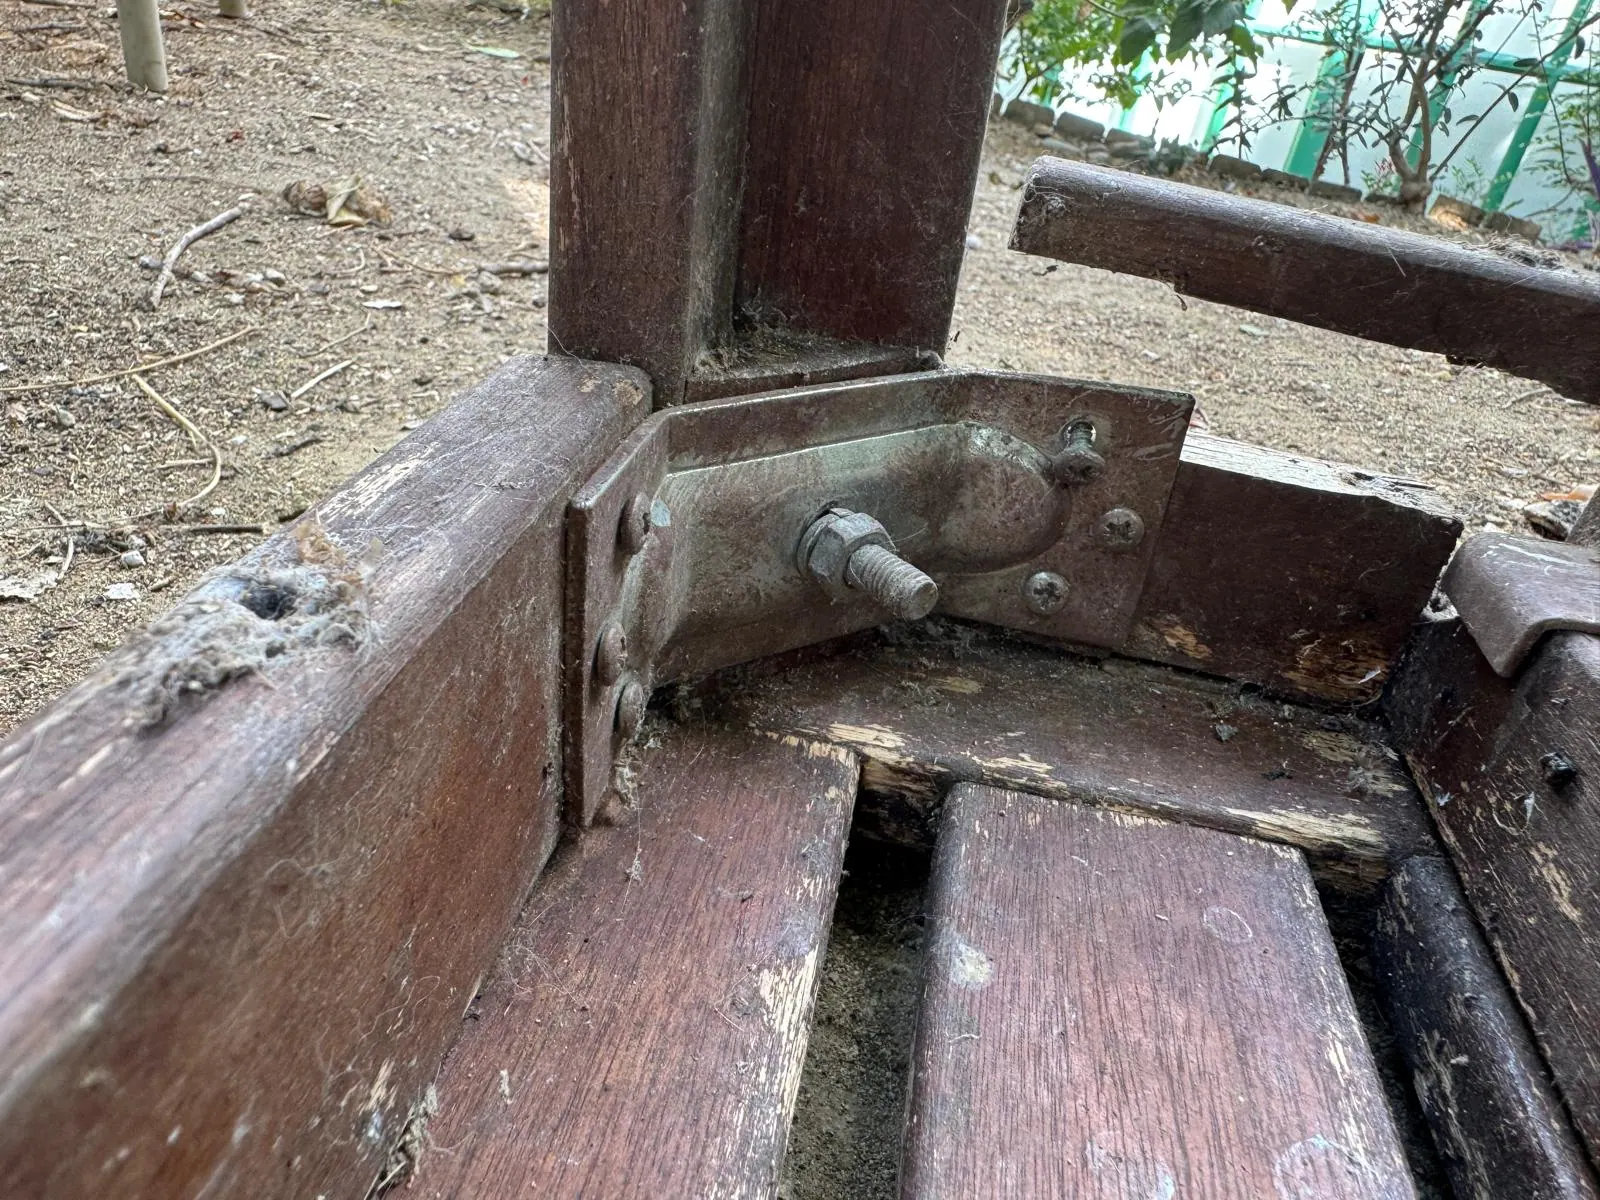 The bracket remained reusable, but the apron beneath it had split and could no longer keep the corner rigid.
Stamped metal brackets tied each leg to the adjoining frame members, or aprons. The arrangement was mechanically sensible: a central threaded fastener clamped the corner while smaller screws fixed the bracket to the wood.
The brackets looked reusable. The wood supporting them had not survived as well. One apron had split near its end, explaining why a bracket could remain present while the frame still moved.
Before removing anything, I photographed the corners, bracket positions, rail overlaps, washers, nuts and existing damage. As the table became a collection of similar-looking parts, those photographs became an essential assembly reference.
How I restored the weathered garden table
The following steps document this table, not a universal specification. Adhesive, abrasive, fastener and finish choices must suit the wood, exposure and product instructions for the item being repaired.
1. Repairing the first separated component
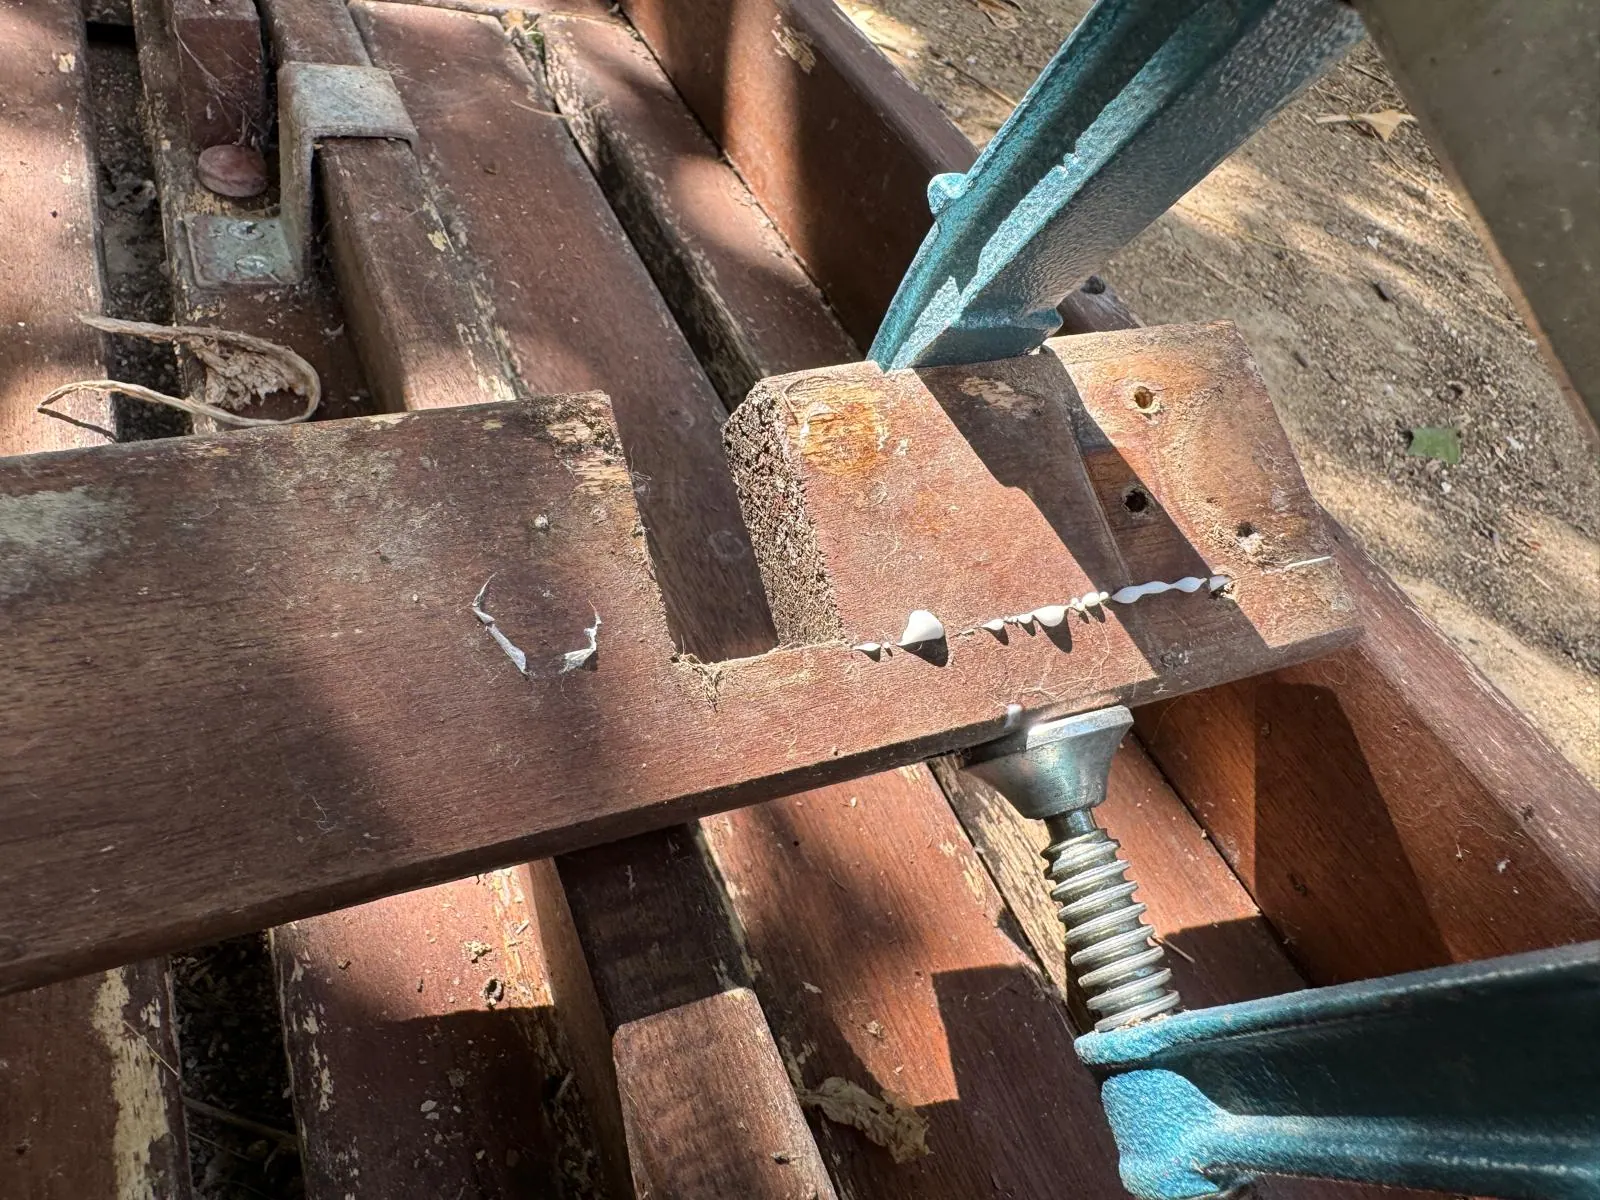 The first structural component was realigned, glued and left undisturbed while the adhesive cured.
I removed the loose piece, cleaned the mating surfaces, applied exterior-suitable wood glue and returned it to its original position. Clamping pressure closed the seam while the component was checked for straightness and alignment.
I removed accessible squeeze-out before it hardened and left the repair clamped for approximately 24 hours. That was my conservative working choice; the adhesive manufacturer’s stated clamp time, curing conditions and full-cure time should govern each project.
2. Disassembling the table carefully
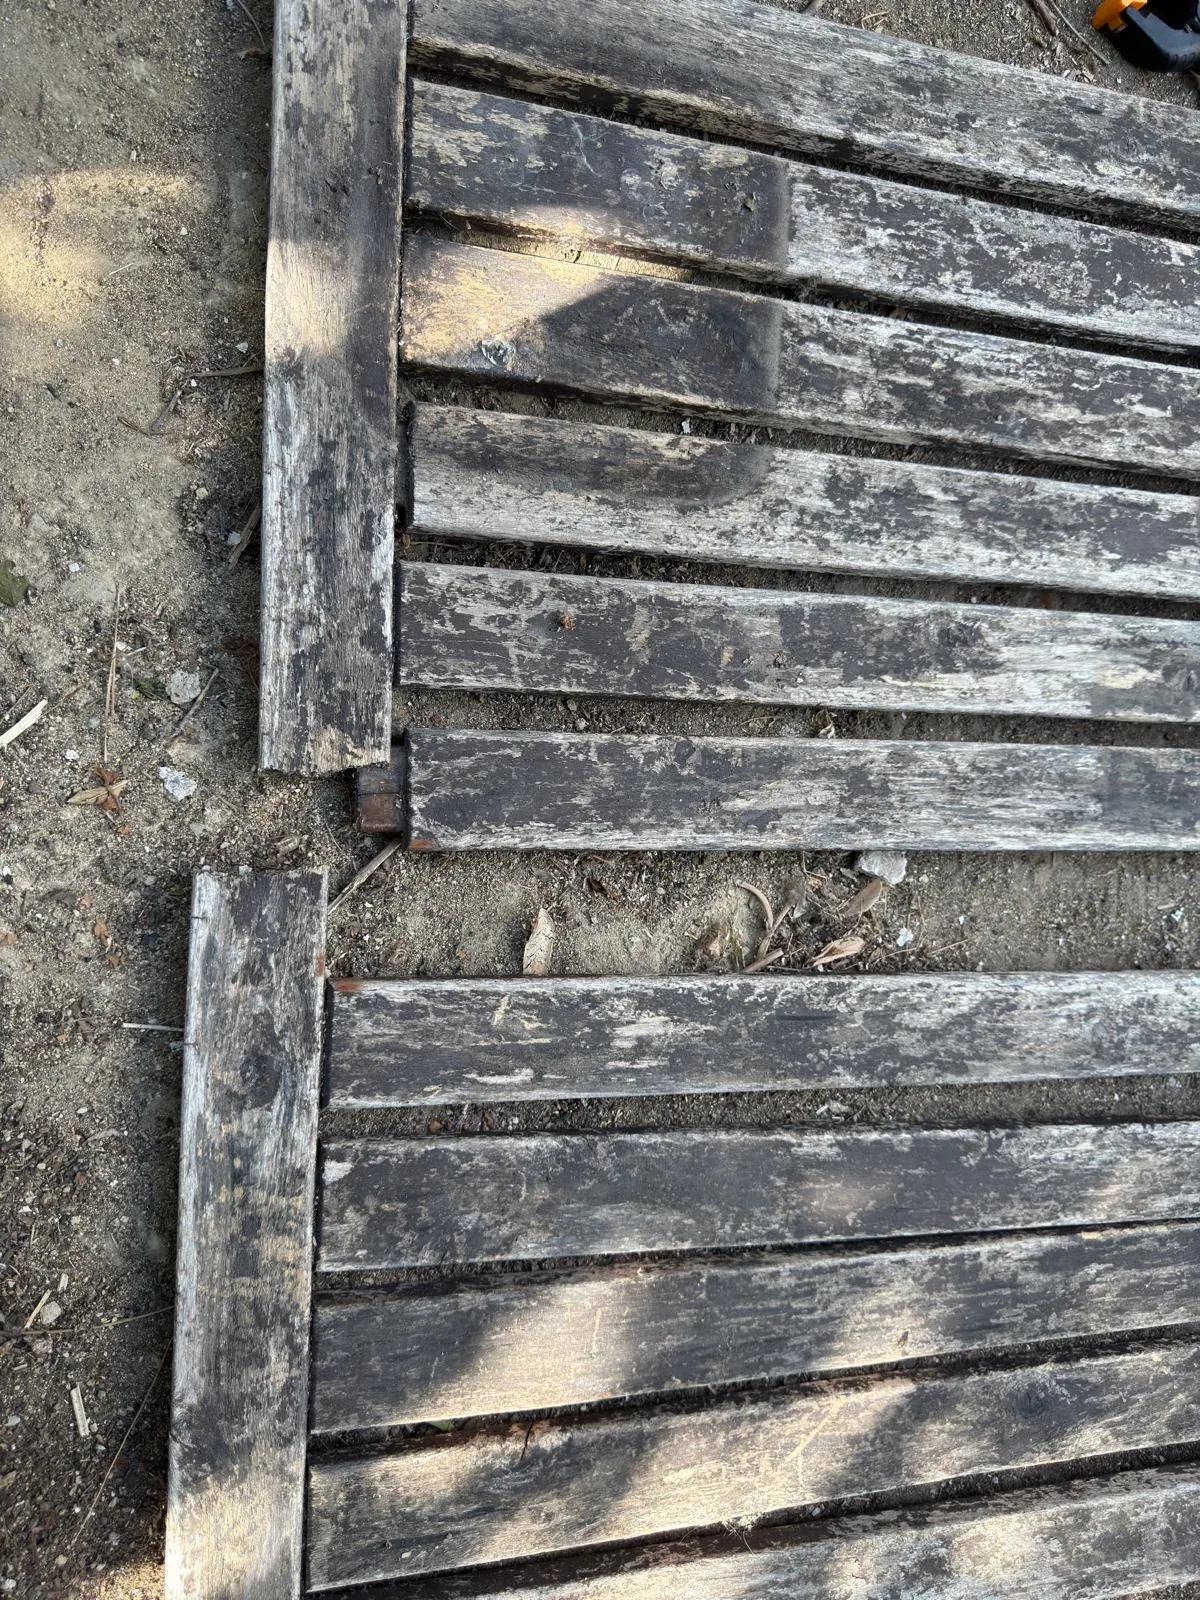 Disassembly exposed how little sound material had been holding one tabletop-frame section together.
One side of the tabletop frame separated into two pieces during careful disassembly. The process did not create the underlying deterioration; removing neighbouring support revealed it.
I retained the pieces as templates for their length, thickness, hole positions, joint geometry, orientation and slat spacing. Even a component that cannot return to service can preserve valuable construction information.
3. Improvising pressure for a long split
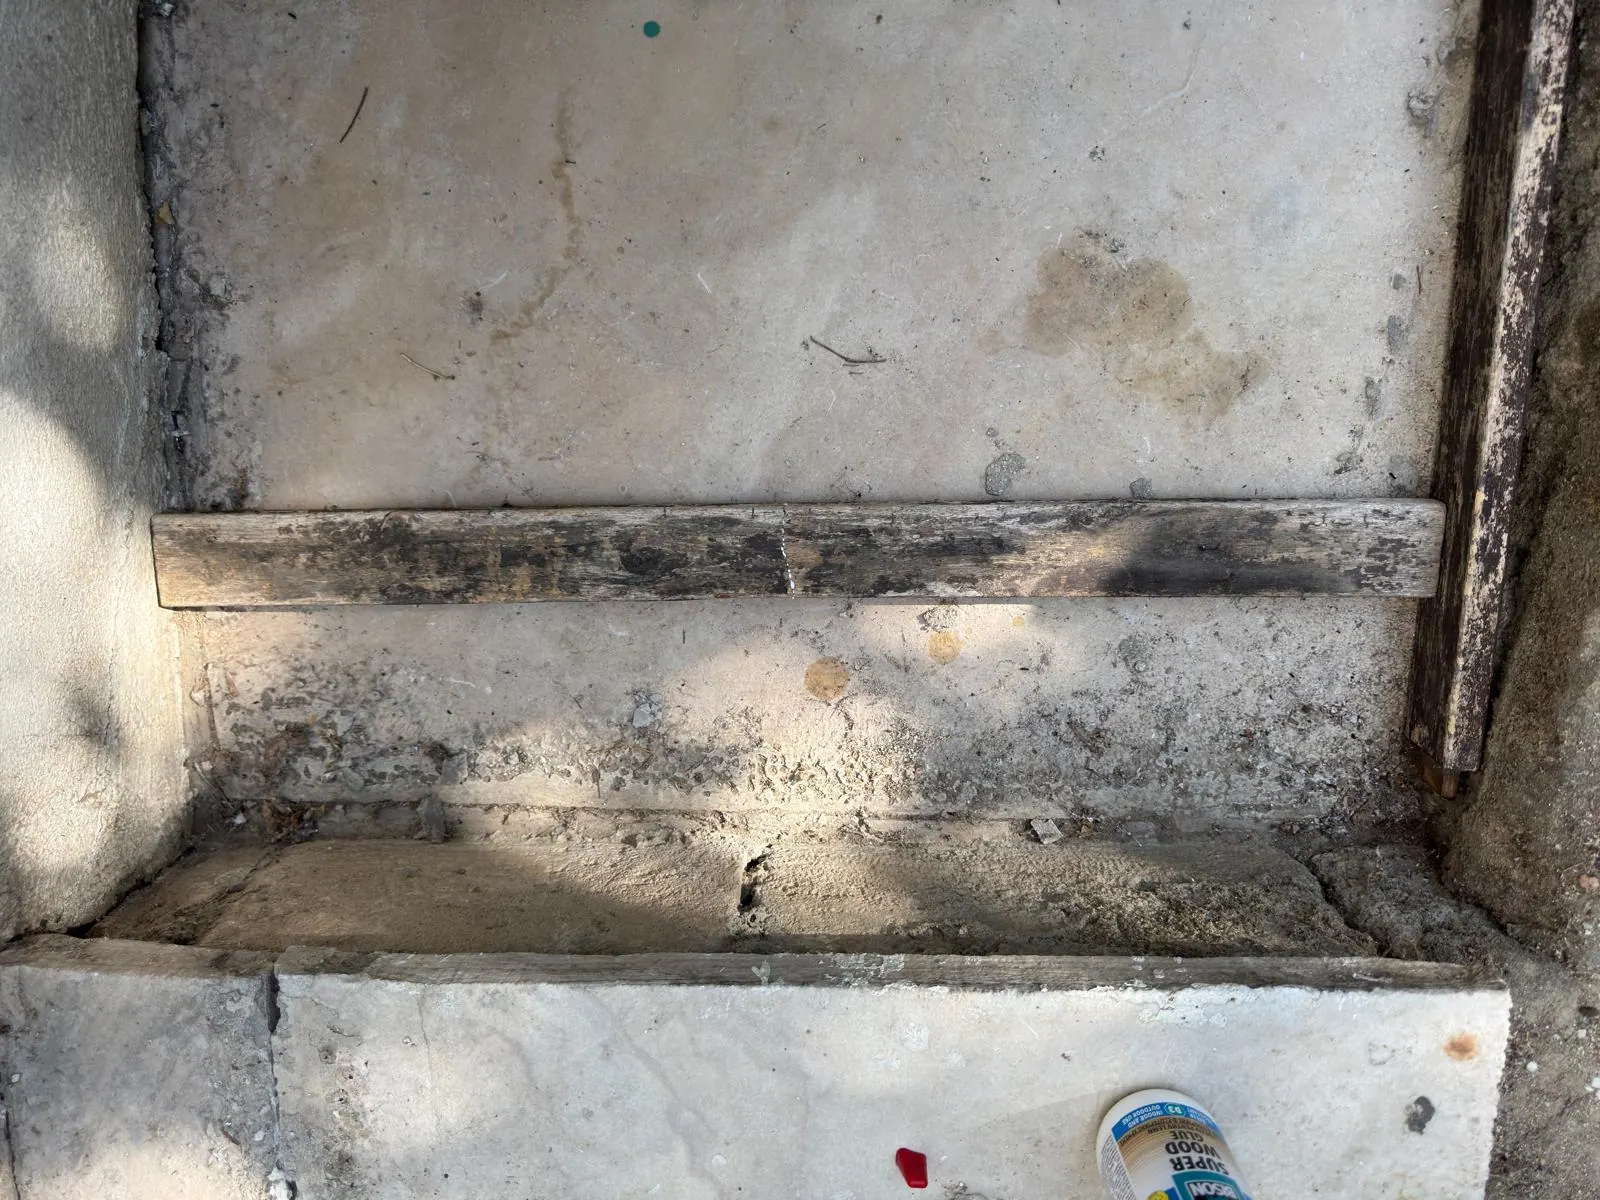 Without a long bar clamp, the garden steps served as a temporary pressure fixture.
Some long components had split along the grain, but my available clamps were too short. After cleaning and gluing one split, I wedged the member between two masonry surfaces that could maintain steady pressure.
Before leaving it, I confirmed that the split was closed, the halves were aligned, and the wood was not twisting, bending or being crushed. The arrangement worked because it reproduced the required mechanical function of a clamp. It would not be appropriate where pressure could not be controlled safely.
4. Sanding the components back to sound wood
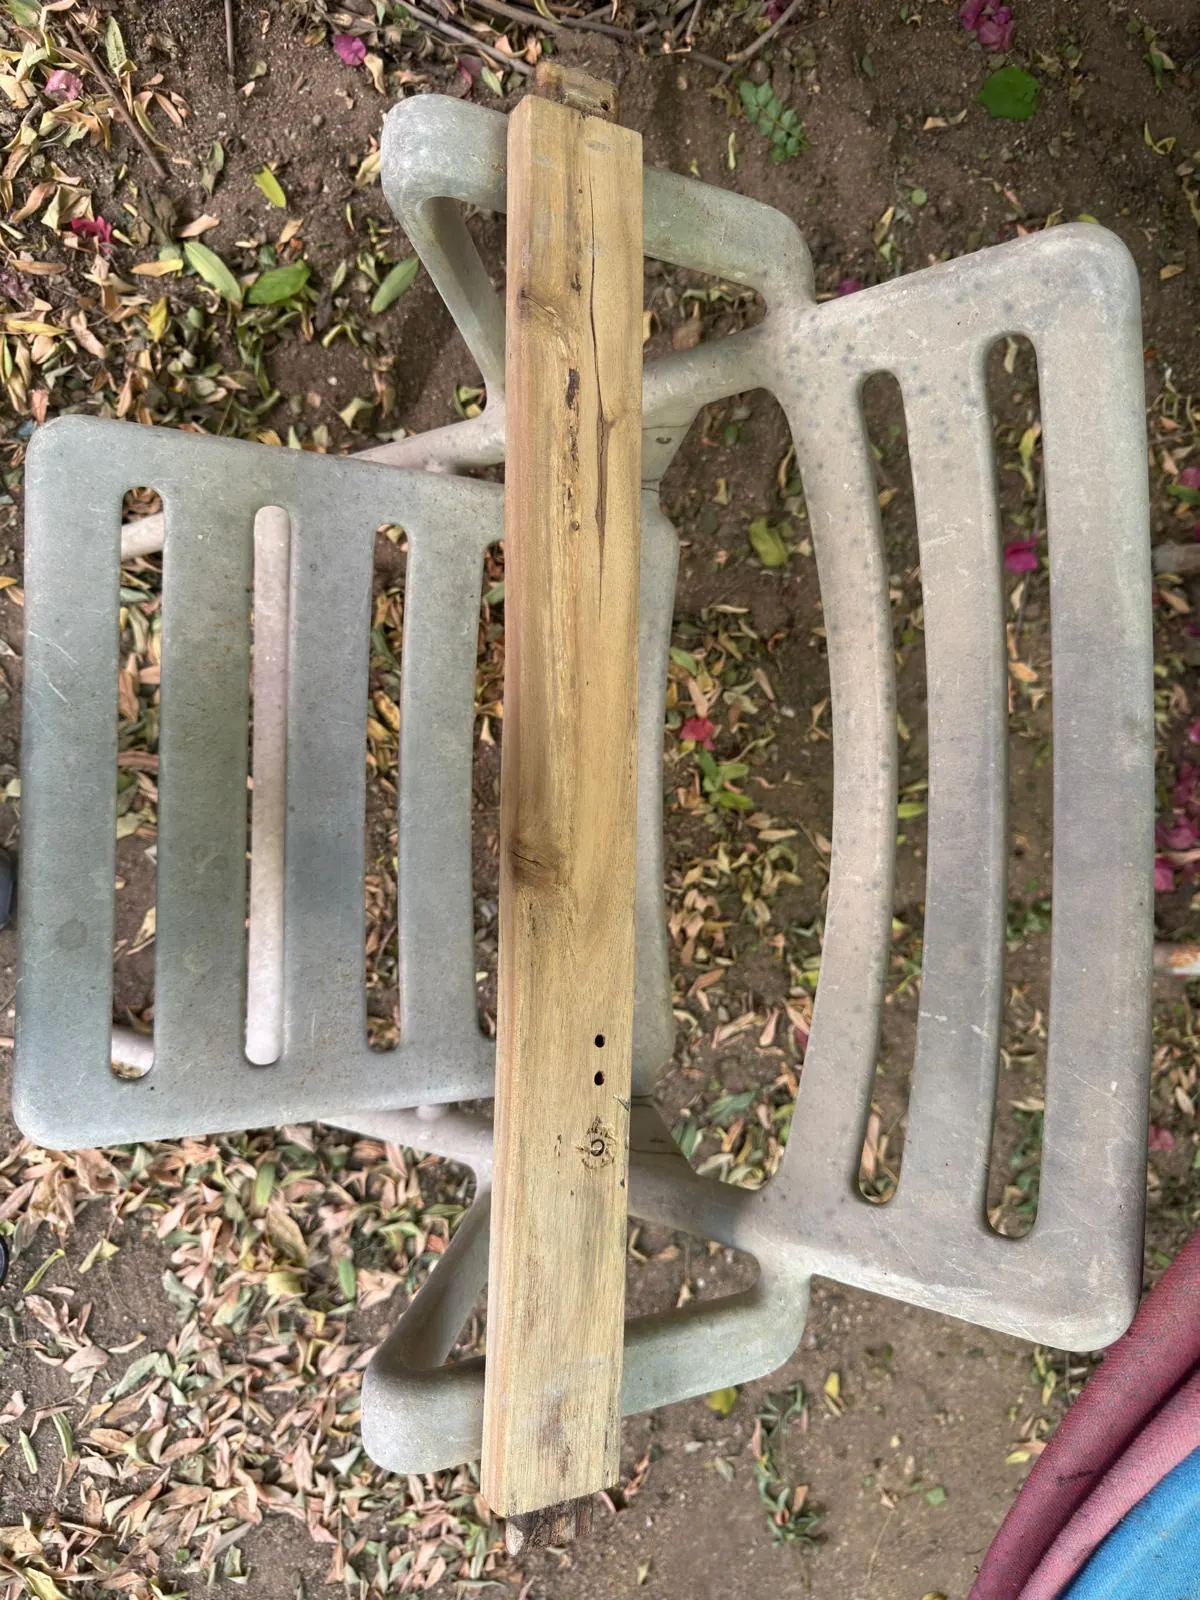 Each component was sanded separately to remove failed finish and loose weathered fibres without changing its joint geometry.
I began with 120-grit abrasive on an orbital sander to remove remaining finish, loose surface fibres, dried adhesive and embedded contamination. After reaching clean, sound wood, I used 220 grit to reduce the coarser marks before applying this particular penetrating finish.
That sequence records what worked here; it is not a rule for every coating or timber. The correct starting and final grits depend on the failed finish, damage, wood species and new finish manufacturer’s preparation instructions. Aggressive sanding can round edges, loosen joints and change component dimensions.
Because the old coating was unidentified, I used eye, hearing and respiratory protection and controlled the dust. Power sanders generate fine wood and coating dust. If an older coating may contain lead or another hazardous material, identify it and use appropriate controls before disturbing it; OSHA’s sanding guidance explains why dust-generating removal requires particular care.
5. Filling cosmetic defects—and not structural holes
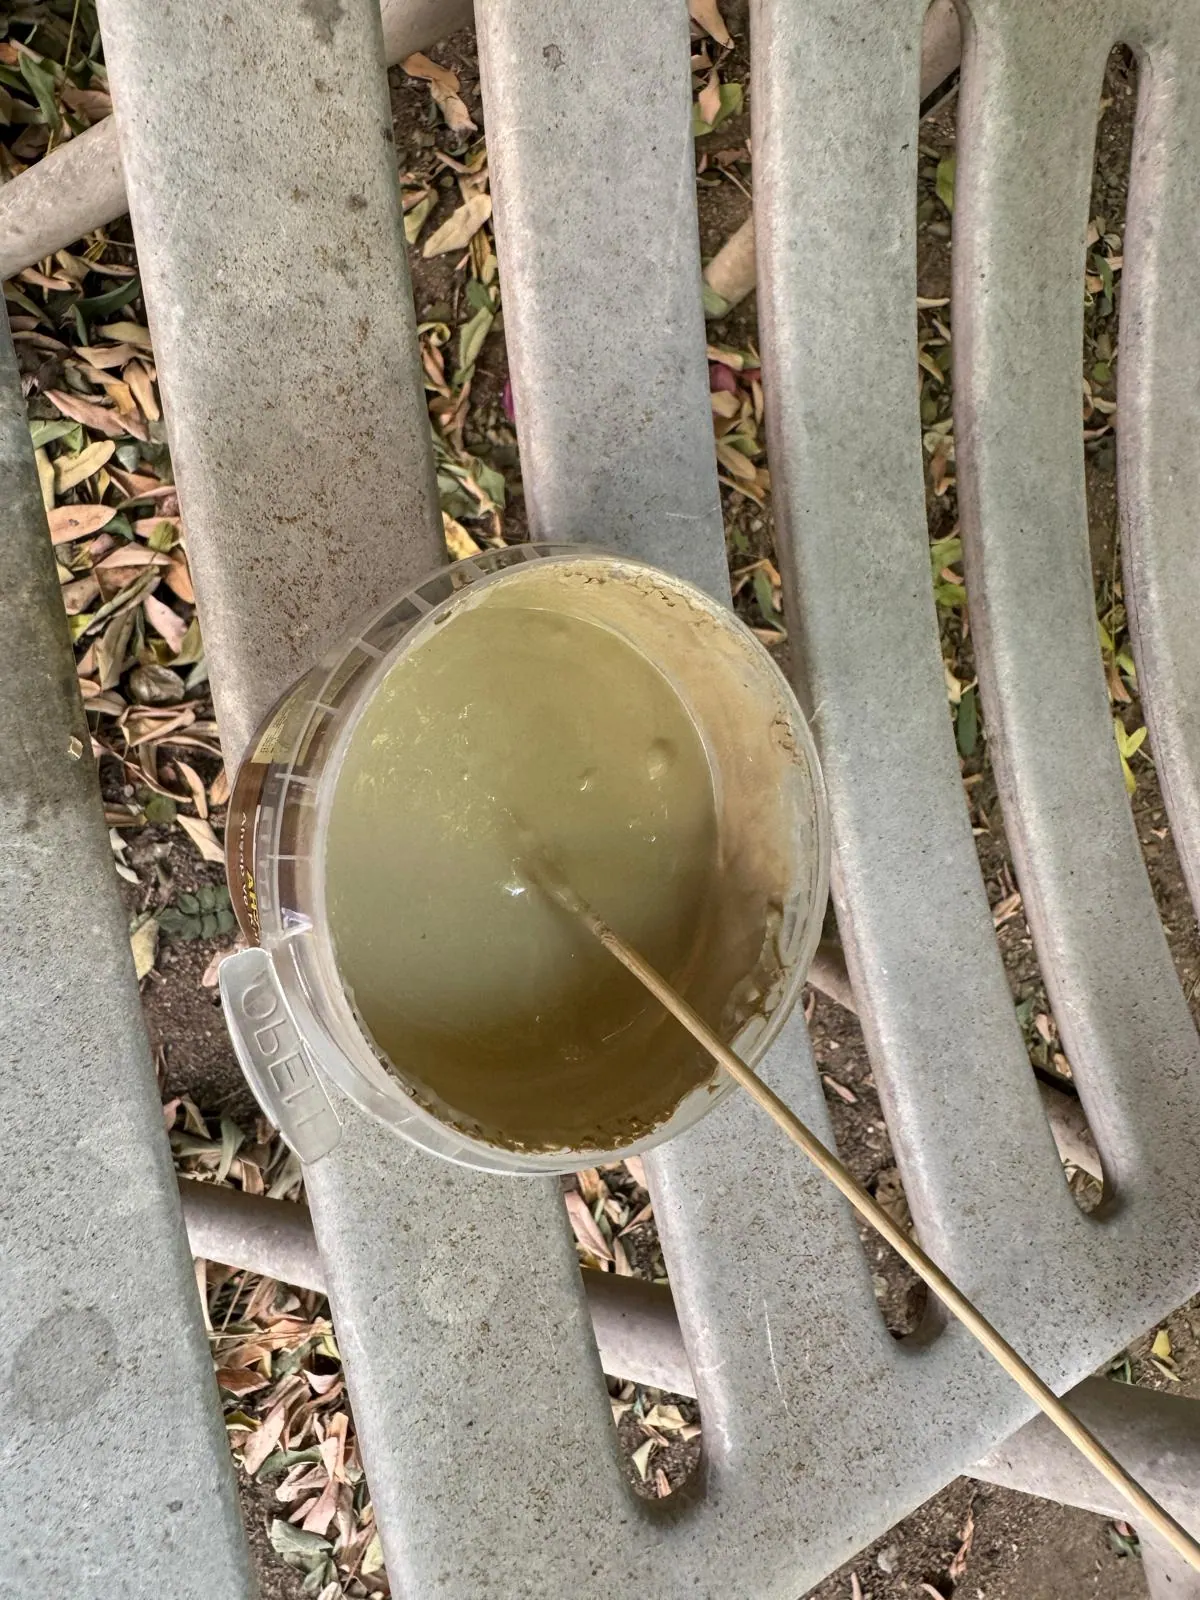 Filler was used on non-structural surface defects, then allowed to cure and sanded smooth.
Once the wood was bare, I filled small checks, scratches, grooves, unused holes and missing surface fibres. I did not fill drainage gaps, alignment features or holes still required for assembly.
Cosmetic filler can improve a surface, but it should not be assumed to restore the holding strength of a stripped structural screw hole. A damaged fastener location may need a glued wooden insert or dowel, followed by a correctly sized pilot hole, or replacement of the affected member.
6. Dry-fitting before finishing
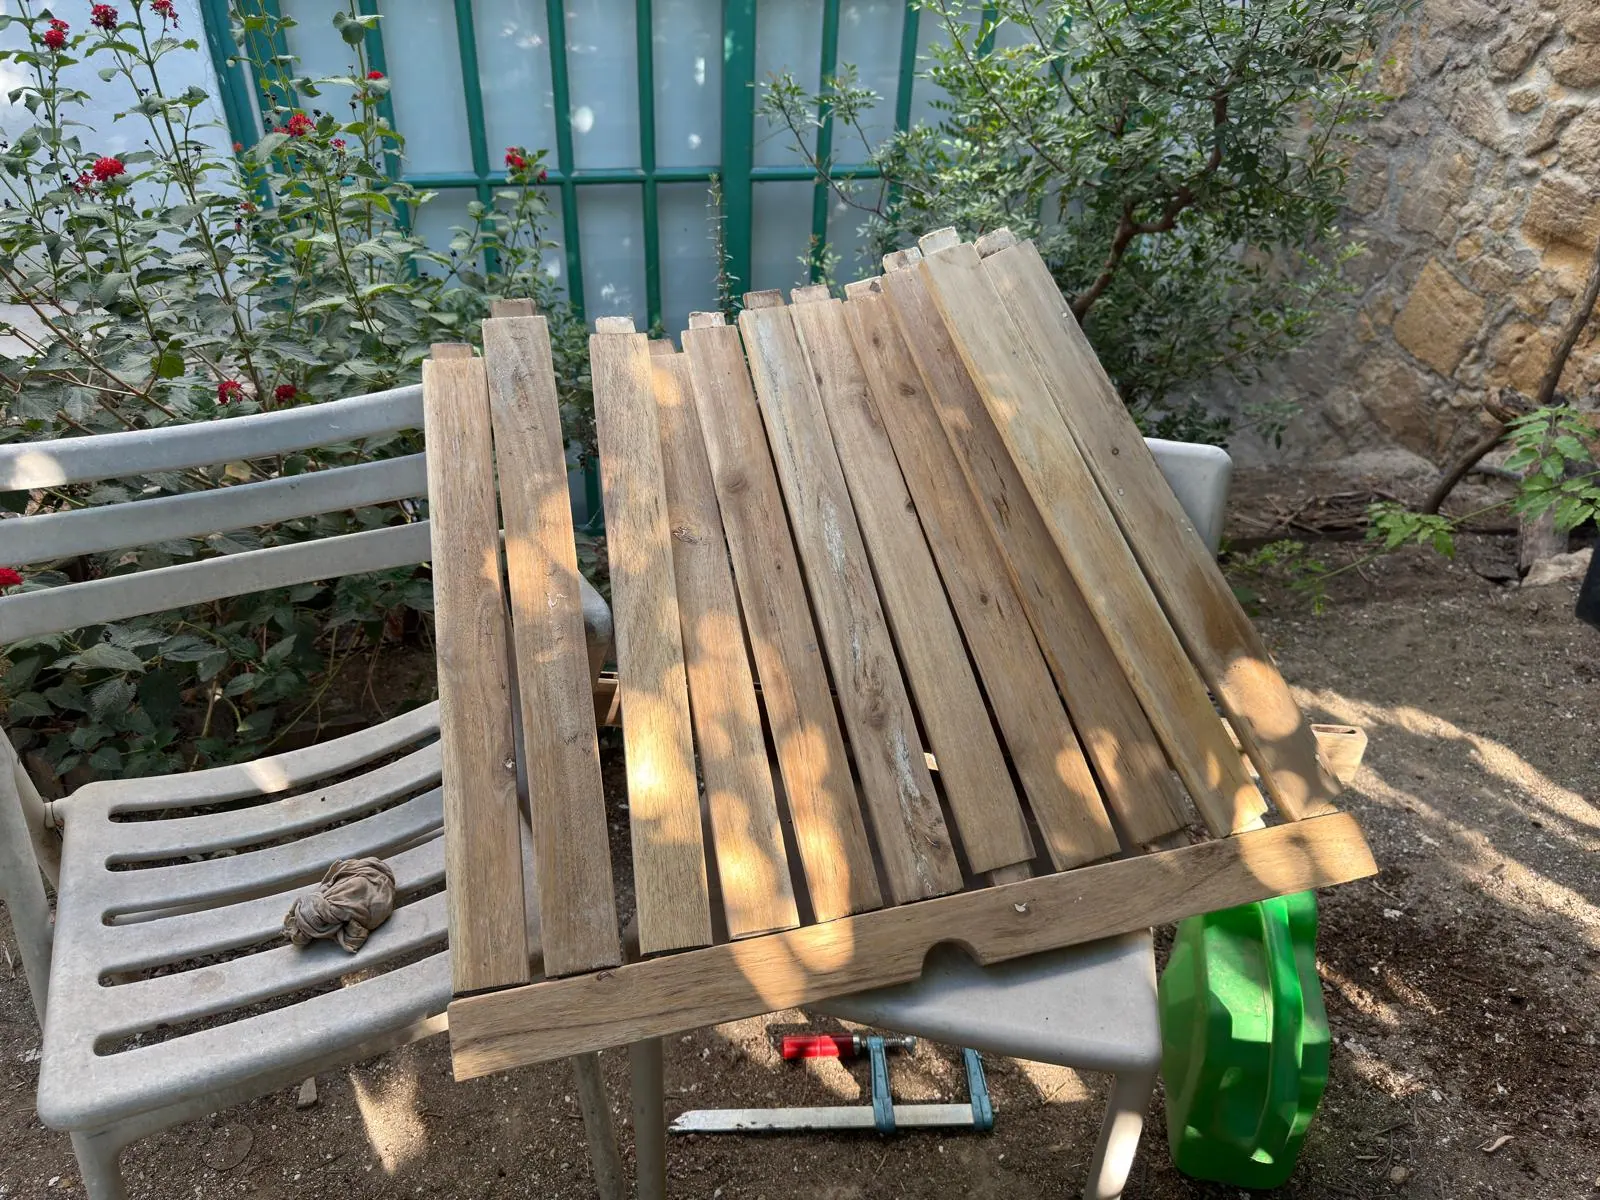 The dry fit checked alignment, spacing and component reuse before finish made corrections more difficult.
I arranged the repaired and sanded components without committing to final glue, fasteners or oil. This checked whether the outer frame remained reasonably square, slats fitted without excessive force, bracket holes aligned and dried glue or filler interfered with any joint.
Several boards remained slightly bowed or twisted after years outdoors. I retained those that still fitted safely and performed their function. The practical acceptance criteria were stability, secure support, safe edges and reasonable alignment—not factory-new uniformity.
7. Cleaning and inspecting the original fasteners
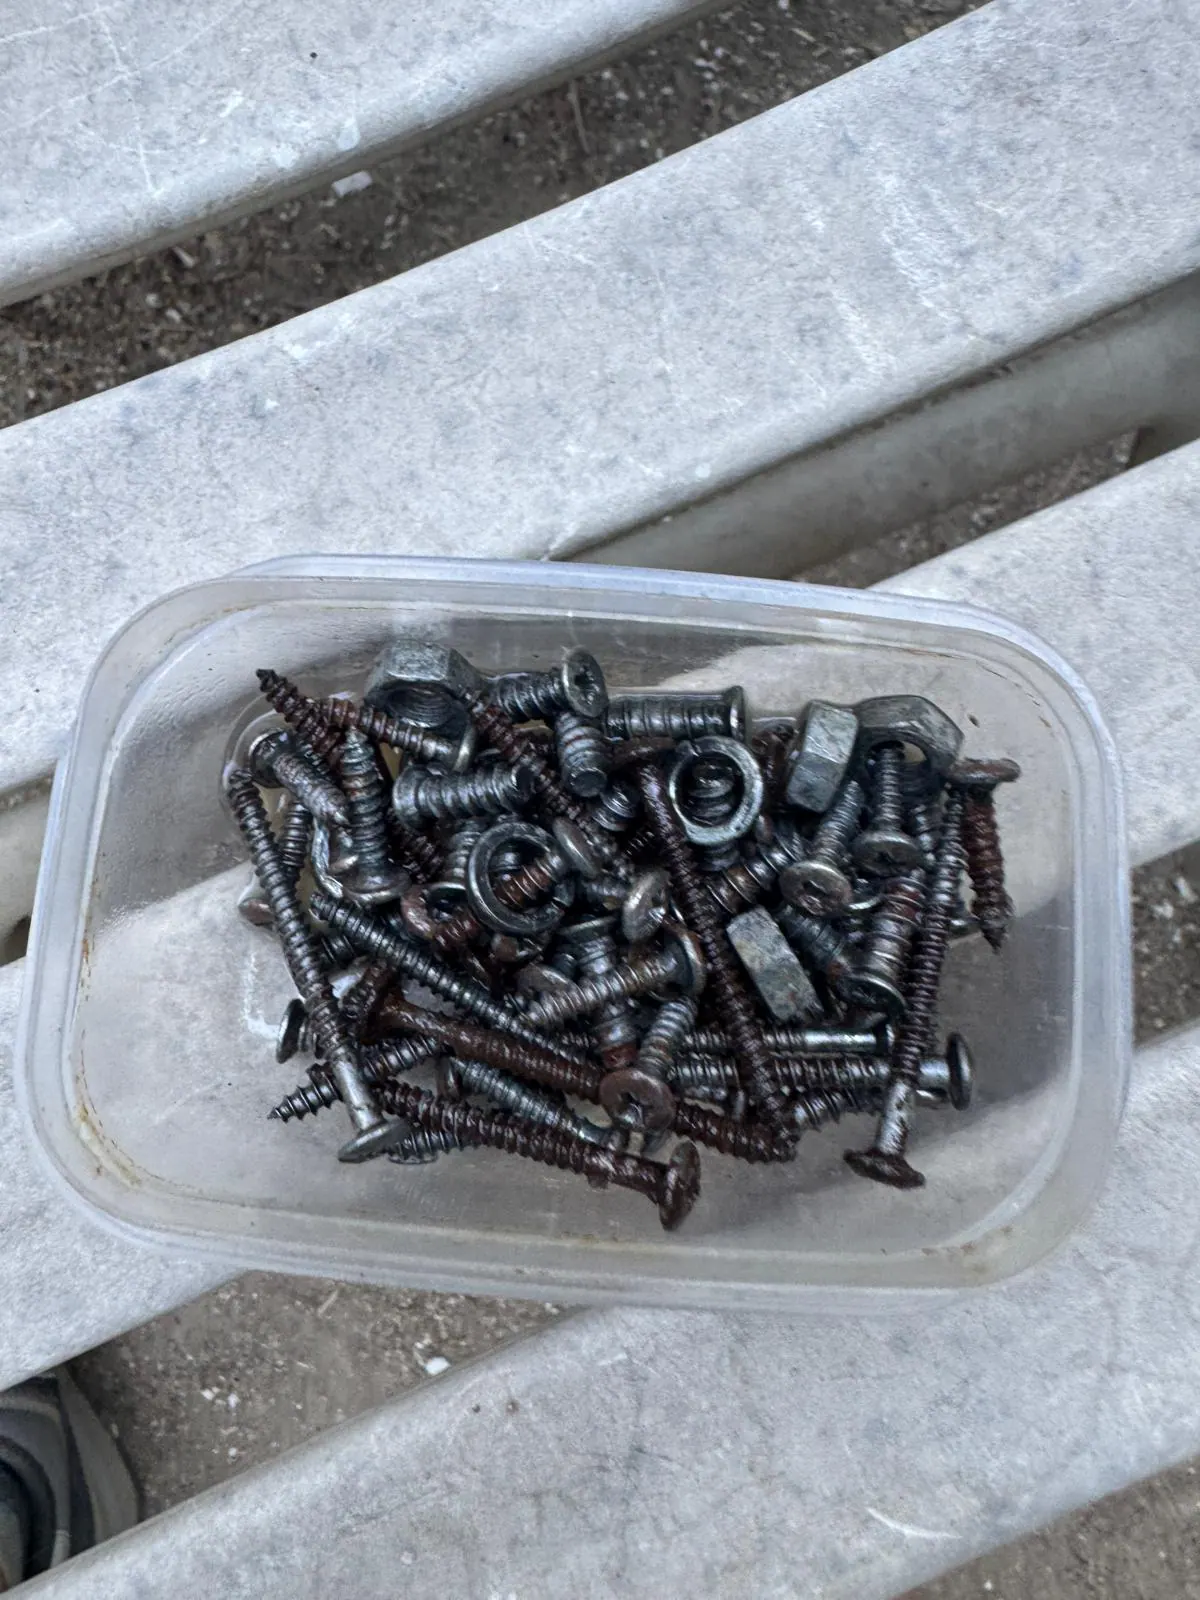 The original hardware was cleaned, dried, inspected and given temporary protection before reassembly.
Almost every screw head showed rust, and some threaded bodies were also corroded. I soaked the removable screws, nuts and washers in white vinegar overnight, cleaned the loosened corrosion, rinsed the parts and dried them thoroughly. A light application of WD-40 displaced residual moisture and provided temporary protection while the project remained in progress; I did not treat it as a durable exterior coating.
Cleaning improves visibility but does not restore metal that corrosion has removed. I rejected any fastener with deep pitting, significant loss of diameter, a bent or cracked shaft, an unusable head or threads that could no longer tighten reliably. Structural joints require sound fasteners of a suitable exterior grade, type, diameter and length.
8. Treating concealed surfaces before assembly
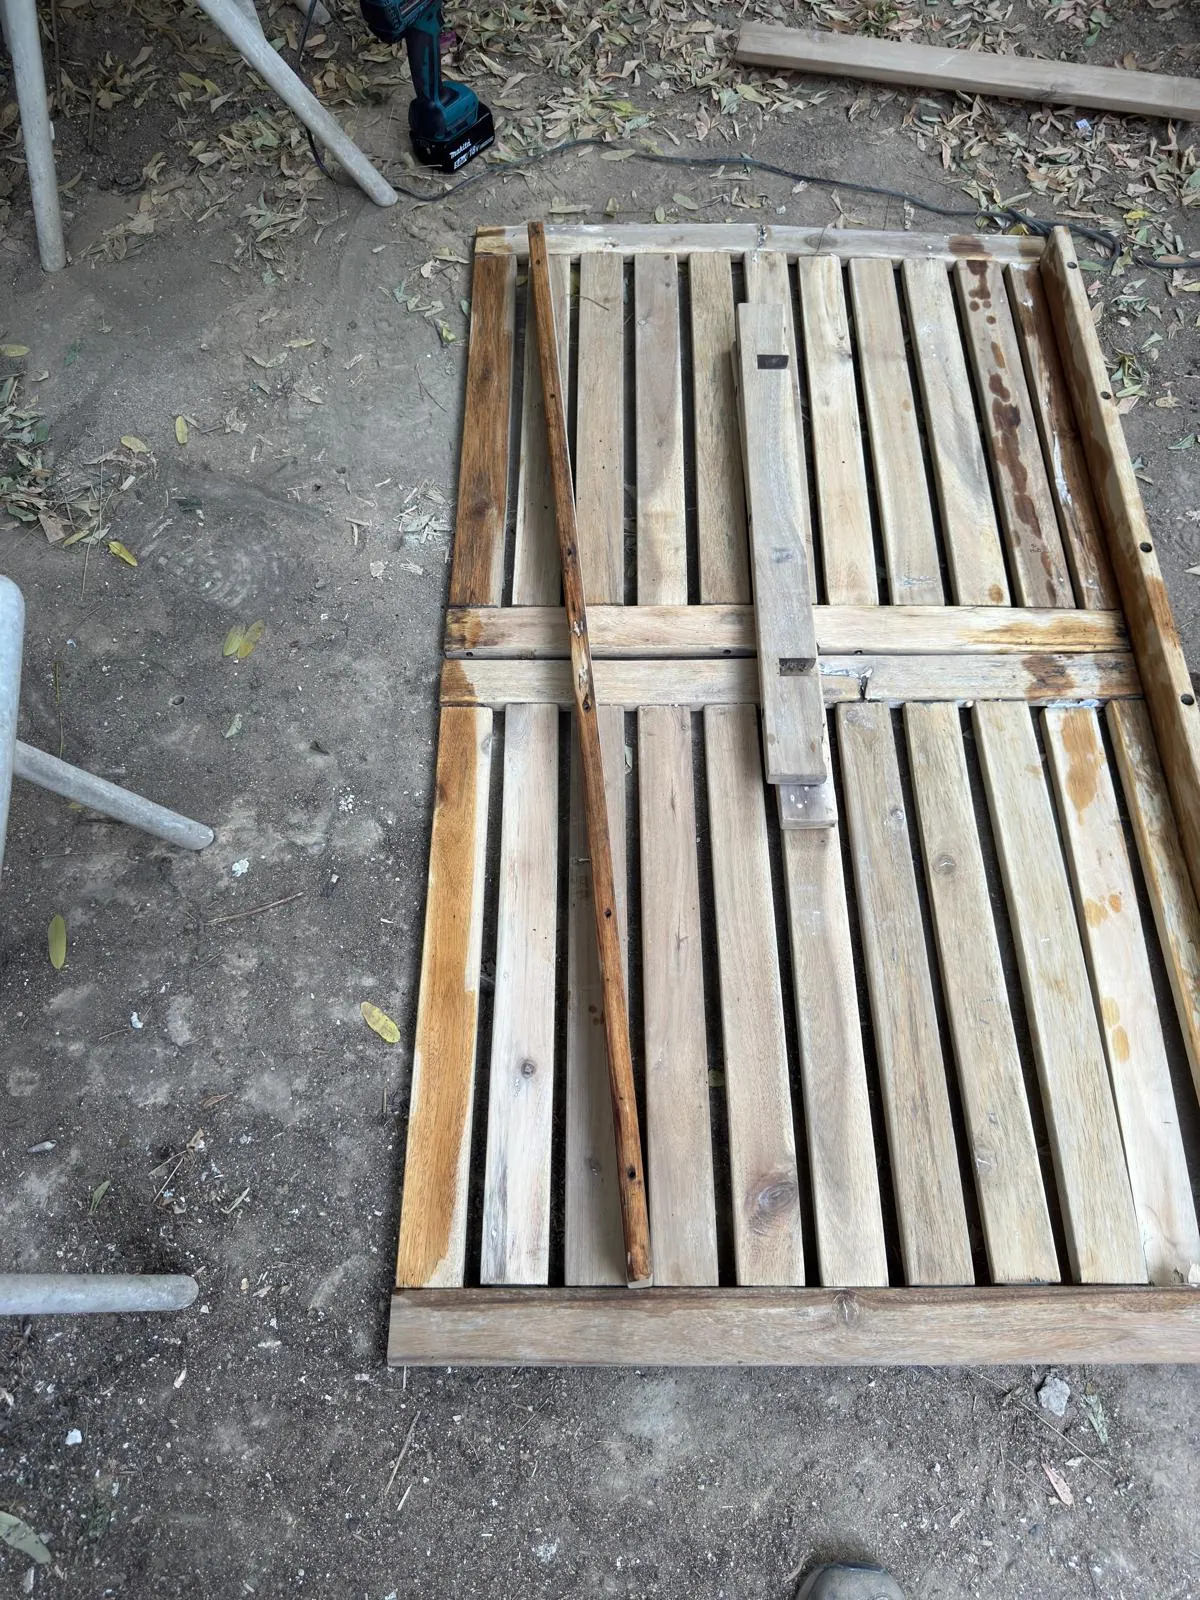 Undersides, cut ends and other soon-to-be-concealed surfaces were treated while they remained accessible.
As the table began coming together face-down, I applied the finish to areas that would become difficult to reach: slat undersides, hidden rail faces, cut ends, exposed end grain and surfaces enclosed by adjoining components.
I chose an exterior teak-oil product intended for garden furniture. “Teak oil” is a product category rather than one fixed formulation, so the instructions for the exact container matter: surface preparation, application amount, excess removal, drying time, recoat interval and exterior suitability can differ.
I kept oil away from any surface that still needed adhesive because a contaminated mating face could weaken the bond. USDA Forest Products Laboratory guidance on exterior wood finishing likewise emphasizes matching the finish and application method to the substrate, desired appearance and required protection.
Fire-safety warning for oily cloths
Do not leave cloths or applicators wet with an oil-based finish crumpled together or piled in a bin. Drying oils can generate heat, and trapped heat can start a fire. Follow the product label and local disposal rules. The National Fire Protection Association’s oily-rag safety sheet gives handling and disposal precautions.
9. Turning better-preserved faces upward
Where geometry allowed, I reversed components so faces that had spent years sheltered beneath the table became the new visible surfaces. Hole positions, joints and bracket clearances still determined whether reversal was possible.
This recovered a better surface without pretending the whole board was new. It also demonstrated how differently the exposed and sheltered faces had weathered.
10. Removing two brackets held by stripped screws
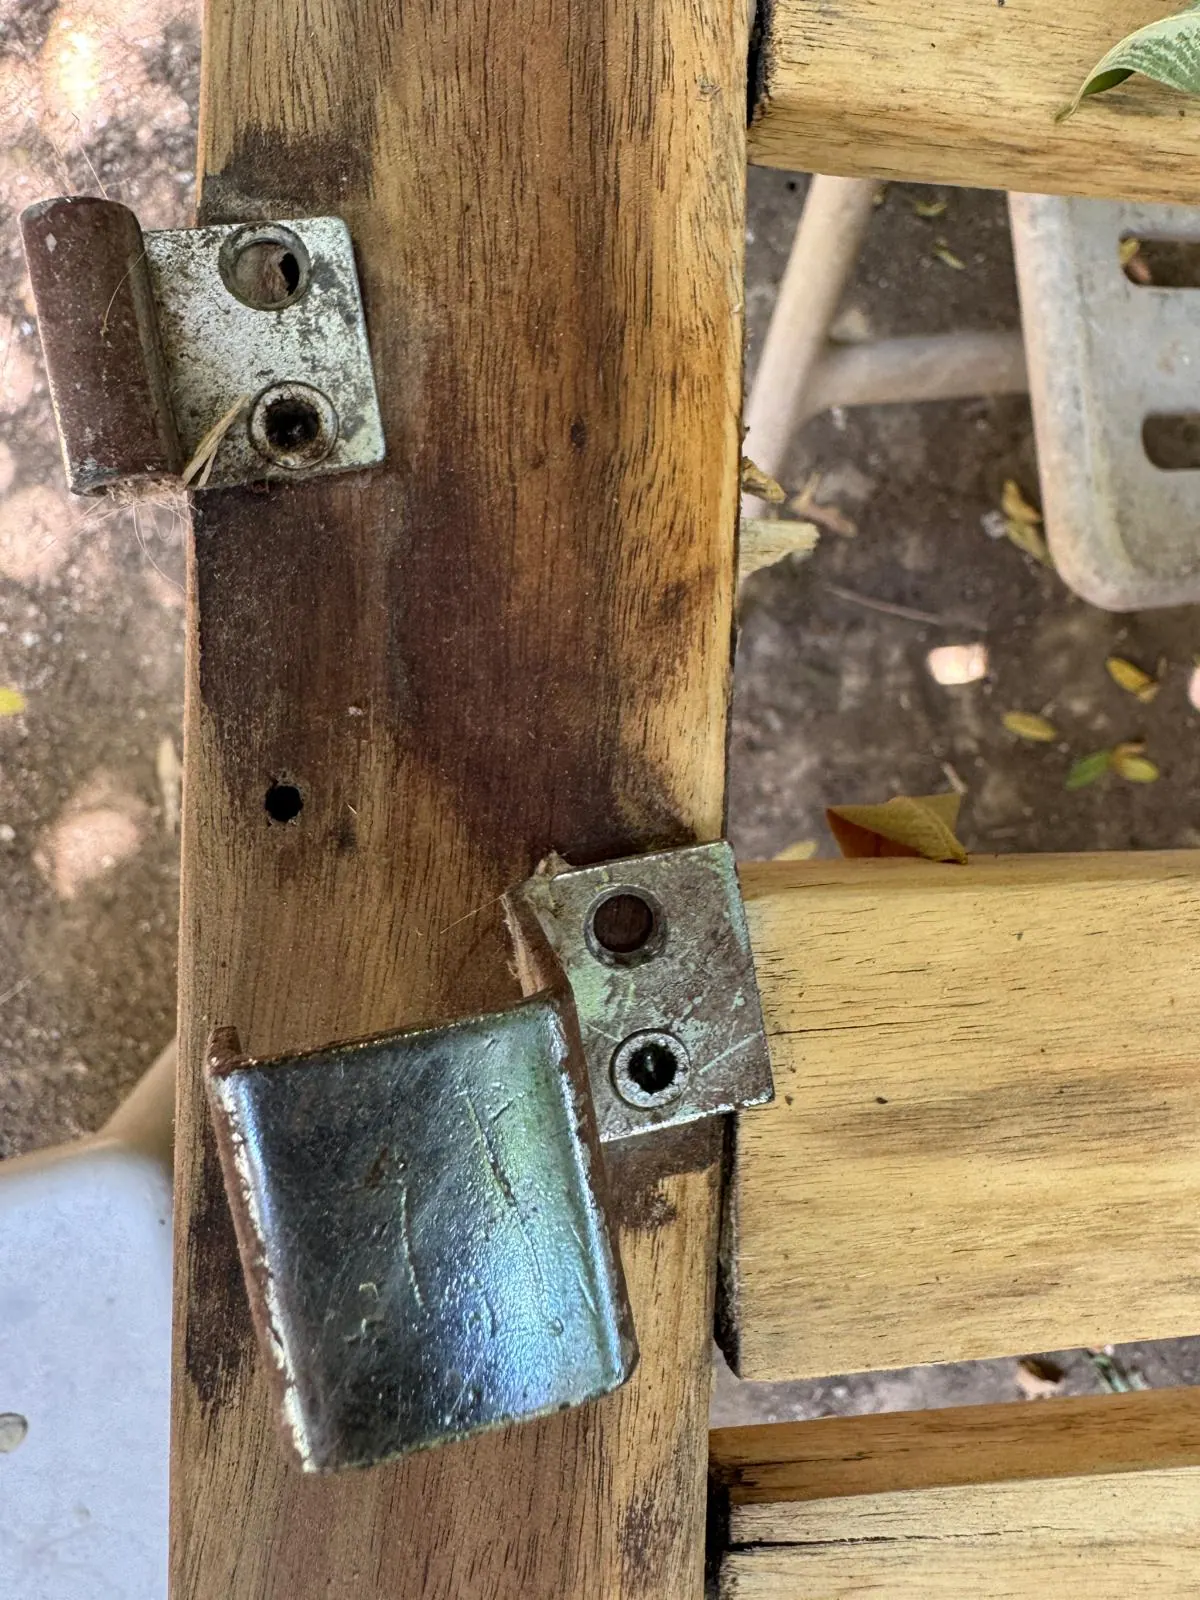 Two damaged screw heads prevented removal of brackets from the extension mechanism.
A screwdriver could not grip the two stripped screws. Driver bits did not move them, and drilling into their damaged recesses did not make them turn.
I eventually selected a drill bit close to each head’s diameter and drilled only until the heads separated from the threaded bodies. Eye protection was essential, the work was supported securely, and I stopped as soon as the brackets could be released.
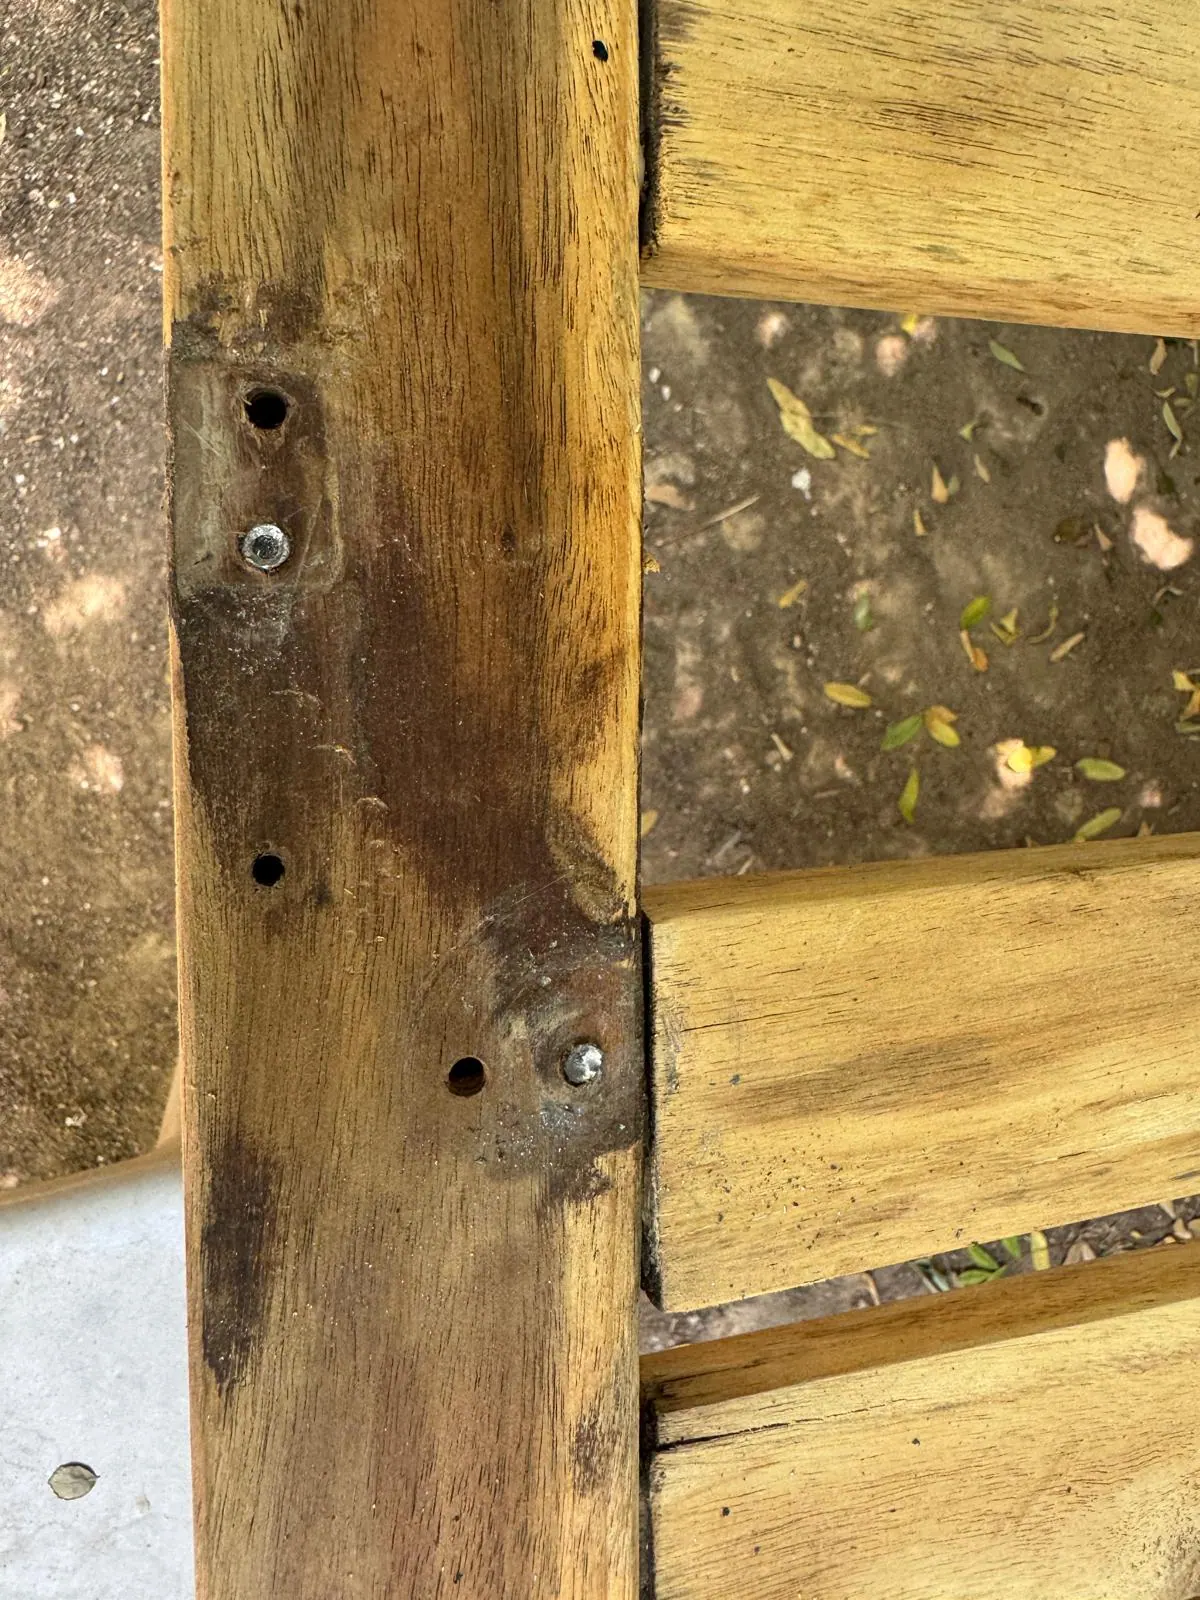 Removing the heads released the brackets; the remaining shafts stayed embedded because excavating them would have damaged sound wood.
The remaining screw shafts no longer interfered with the table or its revised structure, so I left them in place. This was a project-specific least-damage decision—not a general instruction to leave sharp or load-bearing remnants concealed in furniture.
11. Reusing an extension arm as donor wood
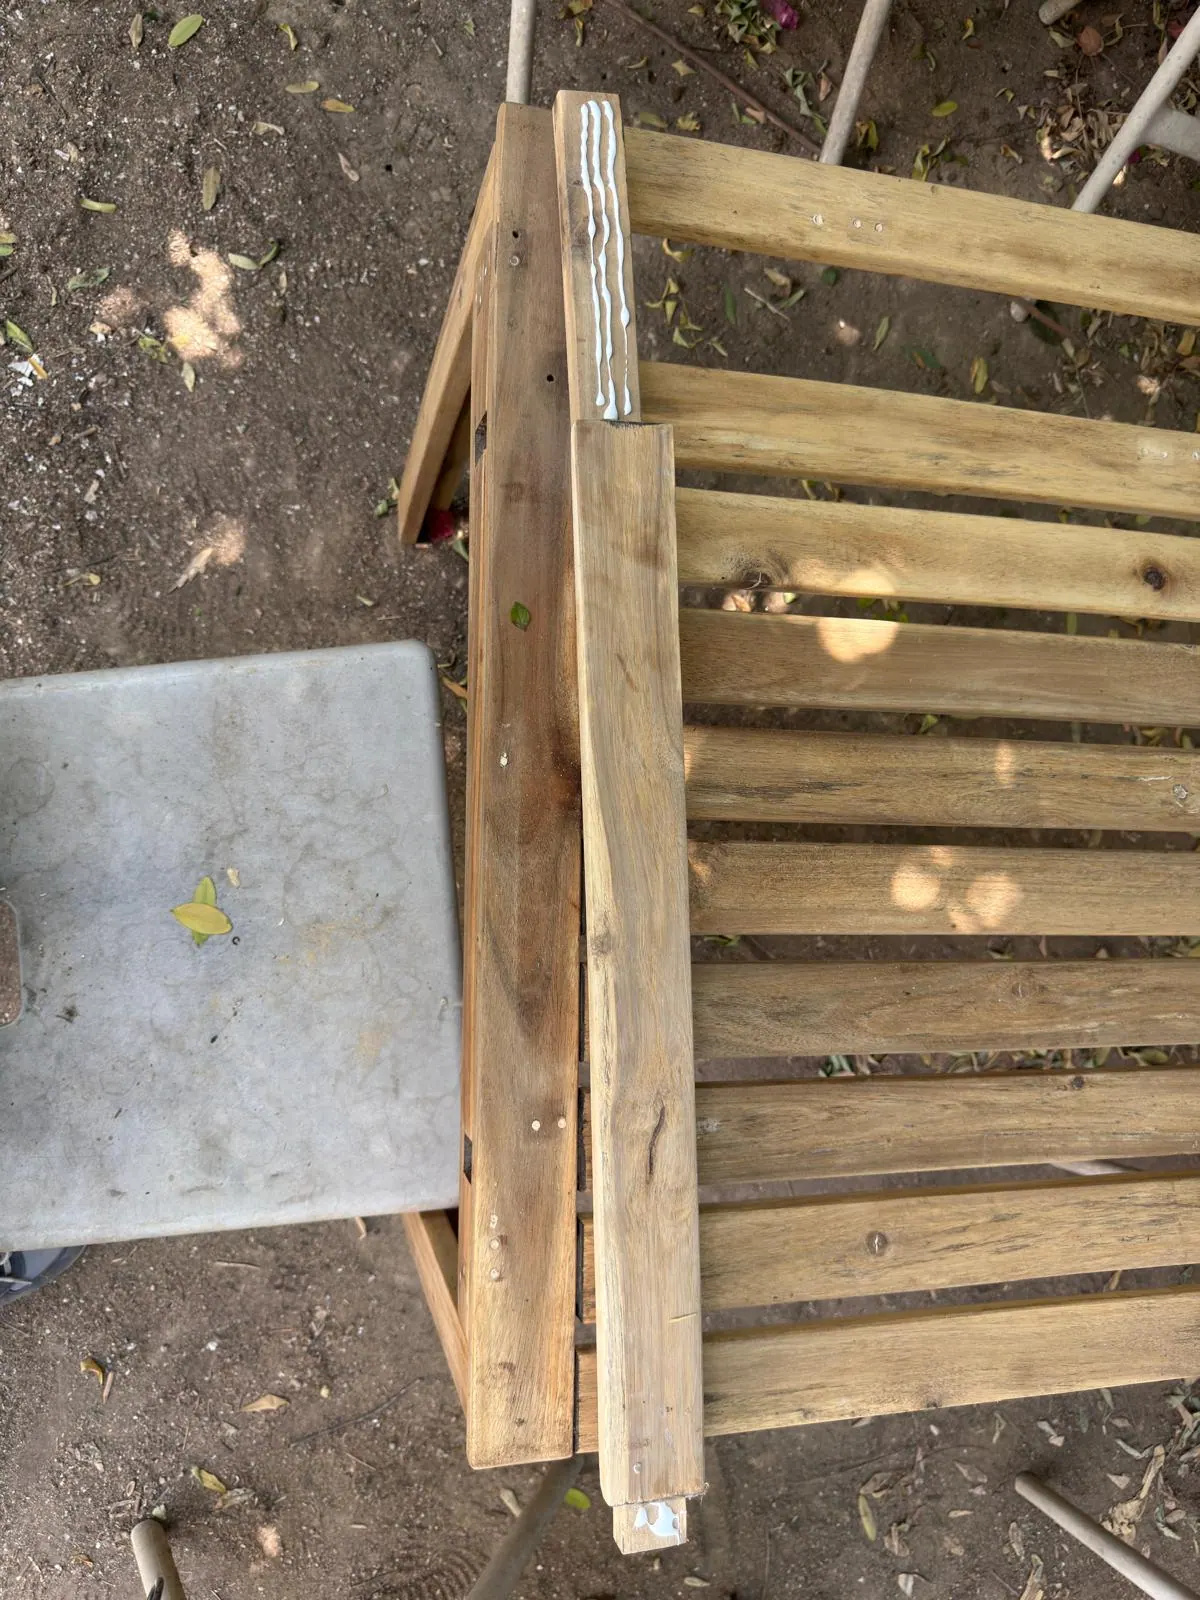 An unused extension arm supplied closely matched donor timber for a rail damaged at both ends.
One tabletop-frame member had too little sound material at its ends for filler or a simple glued repair to restore its role. I removed an unused extension arm, stripped its failed finish and inspected it before positioning it as a reinforcing sister piece beside the damaged rail.
The two pieces were dry-fitted, marked, drilled for pilot holes, glued across their mating surfaces and screwed together. Pilot holes reduced the risk of creating a new split in narrow, dry, aged timber. The reinforcement was then incorporated into the surrounding frame.
The donor arm no longer made the table longer; it made a critical rail stronger.
12. Adding central reinforcement braces
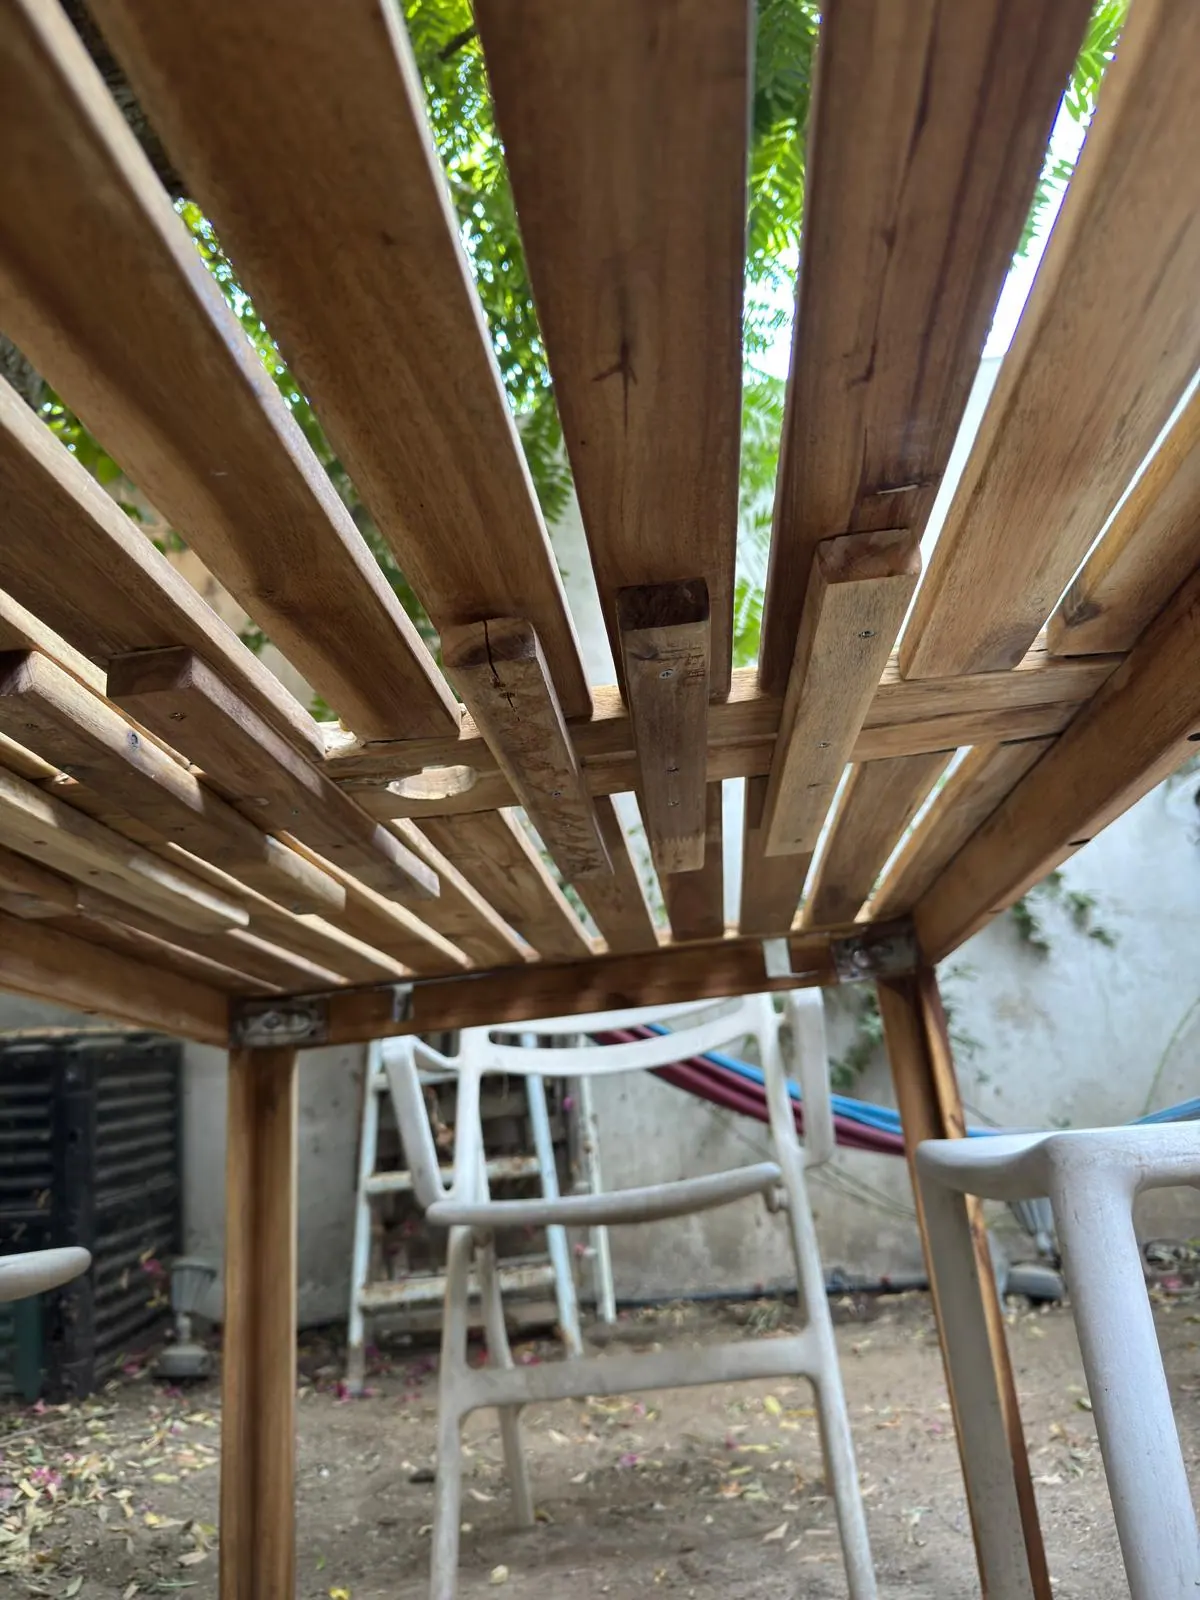 Approximately 50 cm donor-wood braces tied the two tabletop sections together and removed their independent movement.
The remaining sound extension-arm timber supplied several braces approximately 50 cm long. Installed beneath the joint between the two principal tabletop sections, they connected both halves and distributed load across a wider area.
I arranged the braces to remain inside the table’s footprint, clear the leg brackets, preserve drainage gaps and avoid screws breaking through the upper surface. Their suitability depends on this table’s actual geometry and loads; the photograph documents the repair rather than providing a dimensioned design for another table.
Retiring the extension function was a deliberate trade-off. We sacrificed a feature we did not use to strengthen the six-person table we did.
13. Applying the final coats of teak oil
After assembly, I applied the first complete coat and allowed it to dry for a week before inspecting it. Cyprus was close to 40°C at the time, but temperature alone does not prove that a finish has cured. I checked the surface for tackiness and followed the product’s conditions and recoat guidance.
I then applied a second coat, paying particular attention to the slats, rails, end grain, repaired sections, legs, joints and areas that had absorbed the first application quickly. Excess finish, drying time and final handling were governed by the product label.
The surface did not become perfectly uniform. Boards retained different colours, old marks, slight warping and visible repairs. That was an honest result for an old outdoor table.
The finished garden table
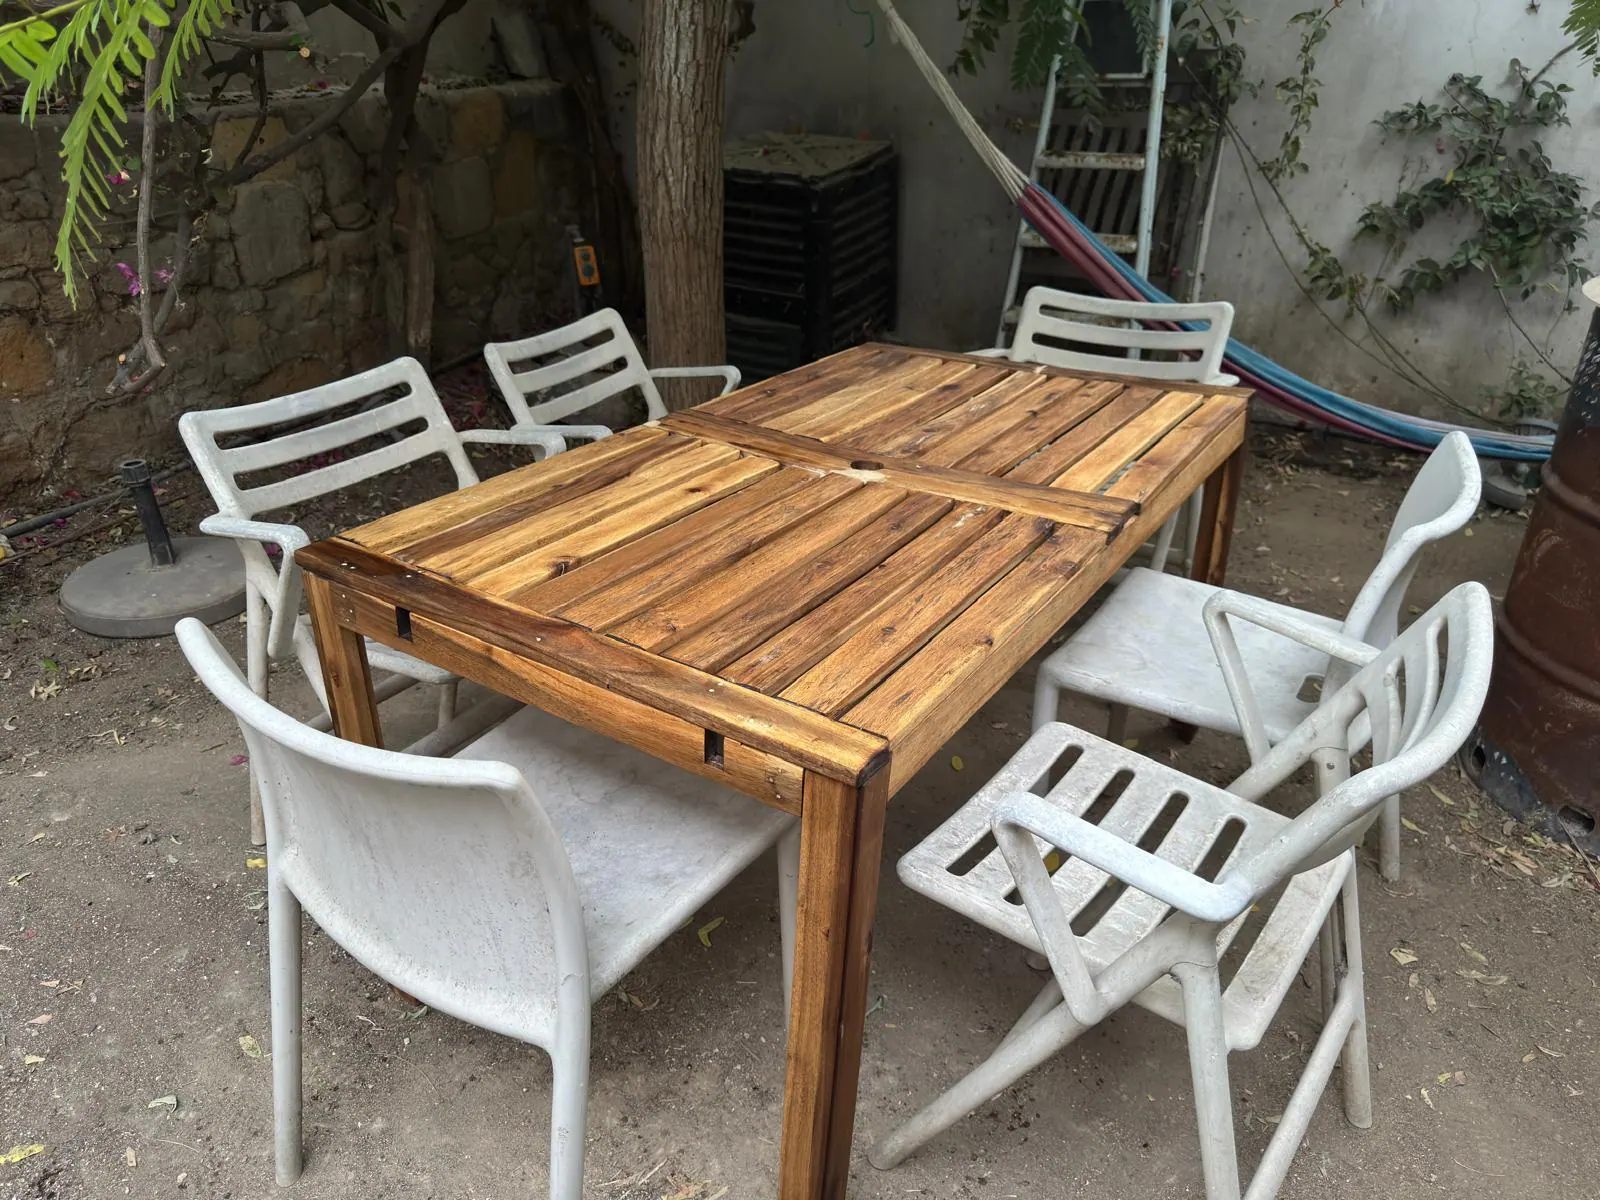 The complete restored table is stable, no longer wobbling and ready for regular family use.
The most important change was not the renewed colour of the timber; it was the way the table behaved.
Before restoration, the opened joints and damaged rails allowed the frame to move. After the split repairs, corner work, donor-wood reinforcement and central bracing, the wobble was gone. The tabletop felt secure in normal use and the table stood firmly on its legs.
The final work included:
- documenting the original construction before disassembly;
- cleaning away garden debris and abandoned insect remains;
- gluing split wooden components;
- sanding each part with a project-specific 120- then 220-grit sequence;
- filling non-structural surface defects;
- dry-fitting before finish and final assembly;
- inspecting cleaned hardware and replacing unsuitable fasteners;
- drilling the heads from two stripped screws to release obsolete brackets;
- reversing suitable components to expose less-weathered faces;
- reusing extension-arm timber to reinforce a failed frame member;
- installing central braces between the tabletop sections; and
- applying two coats of an exterior teak-oil product.
The table can no longer extend, but that function was consciously retired. It still seats six people, and its old extension components now perform a more valuable structural role.
What I learned from this restoration
Structure comes before appearance
The failed finish was the most visible problem, but the opened joints and split rails mattered more. Refinishing a weak frame would only have made an unsafe or unreliable object look better temporarily.
Old furniture may contain its own repair material
The unused extension mechanism supplied aged, dimensionally compatible donor timber. Obsolete features and broken parts can provide repair stock, measurements or templates before they are discarded.
A dry fit prevents finished problems
The dry fit required every repaired component to prove that it still belonged. Correcting alignment on bare wood is easier than discovering an interference after oiling.
Warped does not always mean unusable
A slightly bowed member may remain serviceable when it fits safely and does not compromise stability. Retaining such pieces can preserve material and history, provided acceptance is based on function rather than hope.
Improvisation must reproduce the missing function
The garden-step clamping arrangement worked because it maintained aligned pressure without crushing or distorting the timber. Improvisation becomes useful when the required forces and failure modes are understood.
Complete removal is not always the least-damaging choice
Once the obsolete brackets were released, extracting the remaining screw shafts would have required removing more sound timber. Leaving them embedded was acceptable only because they were secure, harmless and outside the revised load path.
Restoration does not require erasing age
Colour variation, small warps and visible repairs remain. They do not prevent the table from being stable, useful or attractive. They show that it has a history.
If you enjoy this kind of decision-led repair, Attalos Life also documents the restoration of a 50-year-old brass bath bowl and a vintage Perfect Handle screwdriver.
How will I maintain the restored table?
A penetrating oil finish needs inspection and renewal; it is not permanent weatherproofing. My maintenance plan is to:
- remove leaves and debris from between the slats;
- avoid leaving standing water or persistently wet objects on the surface;
- inspect end grain, joints and lower leg sections;
- check brackets and fasteners for renewed movement;
- watch glued and reinforced areas for reopening;
- clean the table before applying maintenance oil;
- renew the finish when its condition and product instructions call for it; and
- shelter the table during severe weather where practical.
The USDA Forest Products Laboratory’s wood-moisture chapter explains that wood exchanges moisture with its surroundings and changes dimension as moisture content changes. Maintenance therefore means monitoring the whole object—not simply adding another coat whenever the colour fades.
A table ready for new memories
For months, I looked at this table from the balcony while most of my workshop was elsewhere. The project eventually came together with a temporary collection of tools, locally sourced materials, photographs taken whenever the heat allowed and an extension mechanism willing to donate its timber.
The table still carries its age. Some boards are slightly warped, colours vary across the surface, and its repairs remain visible. None of that prevents it from doing its job.
It is back in the garden, surrounded by six chairs and ready for breakfasts, evening drinks, long conversations, small gatherings and ordinary moments that may later become important memories.
After the sanding, glue, stubborn screws and donor timber, that is the real purpose of the work: not simply to save an old table, but to give future memories somewhere solid to happen.
Frequently asked questions
Can a badly weathered wooden garden table be restored?
Yes, if enough sound timber remains and the structure can be made stable. Inspect legs, rails, joints, fastener locations and tabletop supports before refinishing. Soft decay, severe material loss or unreliable structural members may require replacement timber—or make replacement of the table the safer choice.
What grit should I use to sand an outdoor wooden table?
For this project, I used 120 grit to remove the failed finish and loose weathered surface, followed by 220 grit before applying the selected penetrating oil. The correct sequence depends on the existing coating, wood and new finish instructions. Avoid sanding so aggressively that you round joints or change part dimensions.
Do warped garden-table boards need to be replaced?
Not always. A slightly bowed or twisted part may remain usable if it fits securely, carries its load, does not destabilise the assembly and creates no hazard. Replace or redesign around any part whose distortion prevents safe assembly.
Can wood filler repair stripped screw holes?
Ordinary cosmetic filler should not be assumed to restore a structural screw hole. A dependable repair may need a glued wooden dowel or insert, a new pilot hole, relocation into sound wood or replacement of the damaged member.
Why did you use teak oil instead of boiled linseed oil?
I selected an exterior teak-oil product marketed for garden furniture after considering this table’s exposure and the products available locally. Product names alone are not specifications: compare the actual formulation, exterior suitability, preparation, application, drying and maintenance instructions.
Can rusted furniture screws be reused?
Only after cleaning and inspection. Replace screws with deep pitting, reduced diameter, damaged heads, bends, cracks or unreliable threads. A cleaned fastener may look better without having regained metal lost to corrosion.
What can I do with a completely stripped screw?
Options depend on access and condition: use the correct driver, gripping pliers, a screw extractor or drill the head away. In this project I drilled two heads only until obsolete brackets could be removed, then left the harmless embedded shafts rather than damaging more wood.
Is it safe to reuse an old extension arm as reinforcement?
It can be when the donor timber is sound, suitably sized and installed without obstructing drainage, other joints or the table’s safe use. This repair was checked against the actual table geometry; it should not be copied by dimensions alone.
How often should teak oil be reapplied?
There is no universal interval. Inspect the surface and follow the exact product’s maintenance instructions. Sunlight, rain, heat, cleaning and use all change the renewal period.
How do I stop a wooden garden table from wobbling?
Find the source of movement before tightening random screws. Check leg-to-apron joints, corner brackets, split rails, stripped fastener holes and tabletop supports. This table stopped wobbling only after the damaged joints were repaired and the two main tabletop sections were tied together securely.